Securing your server is paramount in today’s digital landscape. One fundamental method involves meticulously controlling network access. This guide will demonstrate how to ufw allow specific ip addresses, a critical step for enhancing your server’s security posture. By understanding and implementing UFW rules, you can significantly reduce your attack surface. We will cover the ‘what,’ ‘why,’ and ‘how’ of whitelisting IPs with UFW, ensuring only trusted connections reach your services.
Understanding UFW and Its Role in Server Security
UFW, or Uncomplicated Firewall, is a user-friendly front-end for managing iptables firewall rules on Linux systems. It simplifies the complex process of configuring network security. Many administrators prefer UFW due to its straightforward command syntax and effectiveness. It acts as your server’s first line of defense against unauthorized access attempts.
The Basics of UFW: An Overview
UFW provides a simplified way to manage network traffic. It allows you to define rules for incoming and outgoing connections. These rules dictate which traffic is permitted or denied. For instance, you can block all incoming traffic by default, then selectively open specific ports or IP addresses. This granular control is essential for robust security.
Why ‘Uncomplicated’ Matters in Firewall Management
The “Uncomplicated” aspect of UFW is its greatest strength. Traditional iptables commands can be verbose and prone to error. UFW abstracts this complexity, offering intuitive commands that are easy to learn and implement. This ease of use encourages better security practices among system administrators. It reduces the likelihood of misconfigurations that could leave your server vulnerable.
Importance of Whitelisting Specific IP Addresses
Whitelisting specific IP addresses is a core security principle. It means explicitly allowing traffic only from known, trusted sources. Conversely, all other traffic is implicitly denied. This approach is far more secure than blacklisting, where you try to block known bad actors. Implementing ufw allow specific ip rules creates a fortress around your server, permitting only authorized entities. This is particularly vital for sensitive services like SSH or database connections.
Initial UFW Setup and Status Checks
Before you can begin to ufw allow specific ip addresses, you must ensure UFW is installed and properly configured. These initial steps are crucial for establishing your firewall’s foundation. A correctly set up UFW environment provides the necessary framework for all subsequent security rules. Always verify the status to prevent unintended access issues.
Installing UFW (If Not Already Present)
UFW typically comes pre-installed on Ubuntu and many other Debian-based distributions. However, if it’s missing, you can easily install it using your package manager. Open your terminal and execute the following command: sudo apt update && sudo apt install ufw. This ensures you have the latest version of UFW ready for use. Installation is usually quick and straightforward.
Enabling and Disabling UFW
Once installed, you need to enable UFW to activate its firewall capabilities. Use the command sudo ufw enable. You will receive a warning about potential SSH disconnections; confirm with ‘y’. To disable it temporarily, use sudo ufw disable. Remember, disabling UFW leaves your server unprotected. Therefore, only disable it when absolutely necessary, and re-enable it promptly.
Checking UFW Status and Existing Rules
Regularly checking UFW’s status is vital for verifying its operation. The command sudo ufw status provides a concise overview. For a more detailed list of rules, including their numbering, use sudo ufw status verbose. This command helps you confirm that your new ufw allow specific ip rules are active. It also shows any other rules you might have configured previously.
How to UFW Allow Specific IP Addresses: A Step-by-Step Guide
Now, let’s dive into the practical steps for allowing specific IP addresses through your UFW firewall. This process is fundamental for securing services that should only be accessible from known locations. Following these instructions carefully will help you implement precise access controls. You will learn the exact syntax and see practical examples.
Syntax for Allowing a Single IP Address with UFW
The Basic command to allow a single IP address is straightforward. You will use sudo ufw allow from [IP_ADDRESS]. This rule permits all traffic originating from the specified IP address. For example, to allow access from 192.168.1.100, the command would be sudo ufw allow from 192.168.1.100. This creates a blanket allowance for that particular source.
Practical Example: UFW Allow Specific IP for SSH Access
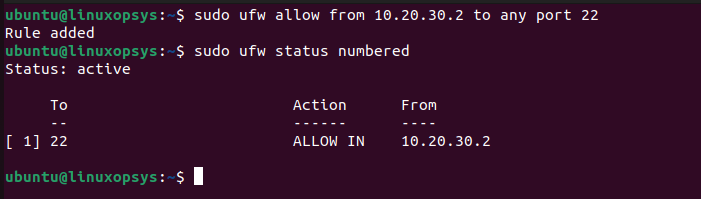
A common scenario is allowing SSH access only from your office or home IP. Suppose your home IP is 203.0.113.45. To allow SSH (port 22) from this IP, you’d use: sudo ufw allow from 203.0.113.45 to any port 22. This is a highly effective way to secure your SSH daemon. It significantly reduces brute-force attack vectors. Remember to replace the example IP with your actual source IP address.
Furthermore, you might need to allow access to a web server (port 80 or 443) from a specific monitoring service’s IP. If the monitoring service uses 198.51.100.10, the command would be: sudo ufw allow from 198.51.100.10 to any port 80. Similarly, for HTTPS, you would specify port 443. This precise control is a cornerstone of modern server security. You can find more information on UFW commands on the official Ubuntu documentation: Ubuntu UFW Guide.
Verifying the New UFW Allow Rule
After adding any new rule, it’s crucial to verify its successful implementation. Use the command sudo ufw status verbose to list all active rules. Look for the rule you just added, ensuring the IP address and port (if specified) are correct. This verification step prevents misconfigurations that could either block legitimate traffic or leave your server exposed. Always double-check your work.
Advanced UFW IP Filtering: Ranges, Subnets, and Ports
While allowing a single IP is useful, real-world scenarios often require more flexible filtering. UFW supports allowing entire ranges of IP addresses or subnets. This capability is invaluable for corporate networks or cloud environments. You can also combine IP rules with specific port definitions. This allows for highly granular control over network traffic.
Allowing a Range of IP Addresses with UFW
Sometimes, you need to grant access to a group of sequential IP addresses. UFW allows you to specify a range using a subnet mask. For instance, to allow IPs from 192.168.1.10 to 192.168.1.20, you might use a CIDR notation. However, UFW’s direct range support is for subnets. For a true range, you’d often need multiple rules or a broader subnet. A more common approach is to use CIDR for subnets.
Granting Access to an Entire Subnet Using UFW
To allow access from an entire subnet, you use CIDR notation. For example, to allow all IPs within the 192.168.1.0/24 subnet, the command is: sudo ufw allow from 192.168.1.0/24. This is incredibly useful for internal networks or specific branch offices. It simplifies rule management compared to adding each IP individually. This command effectively implements a broad ufw allow specific ip range.
Combining UFW Allow Specific IP Rules with Specific Ports (e.g., HTTP, HTTPS)
The true power of UFW comes from combining IP rules with port specifications. This allows you to open a service only to a specific IP or subnet. For example, to allow HTTP (port 80) from a specific IP: sudo ufw allow from 203.0.113.50 to any port 80. For HTTPS (port 443) from a subnet: sudo ufw allow from 192.168.2.0/24 to any port 443. This precision ensures that only the necessary services are exposed to trusted sources.
Managing and Reviewing Your UFW IP Rules
Effective firewall management involves more than just adding rules. You must regularly review, modify, and, if necessary, delete existing rules. Keeping your UFW configuration tidy and accurate is crucial for maintaining strong security. Over time, old rules can become obsolete or even create vulnerabilities. Therefore, active management is key.
Listing All Active UFW Rules
As mentioned, sudo ufw status verbose is your go-to command for reviewing rules. It displays rules with their corresponding numbers, which is essential for deletion. This detailed output helps you identify any redundant or incorrect rules. Regularly checking this status ensures your firewall configuration remains aligned with your security policies. It’s a critical step after any changes.
Deleting Specific UFW Allow Rules
To remove a rule, you can either specify the exact rule or its number. Deleting by number is often easier. First, run sudo ufw status numbered to see the rule numbers. Then, use sudo ufw delete [RULE_NUMBER]. For example, sudo ufw delete 5 would delete the fifth rule. Be cautious when deleting rules, as removing a necessary rule could disrupt services. Always confirm before proceeding.
Resetting UFW to Default Settings (Use with Caution)
In complex situations or after significant misconfigurations, you might need to reset UFW to its default state. The command for this is sudo ufw reset. This action will delete all existing rules and disable the firewall. It’s a powerful command and should be used with extreme caution. Always have a Backup plan or be prepared to reconfigure your firewall immediately after a reset. This ensures your server remains protected.
Frequently Asked Questions
How do I allow multiple specific IPs with UFW?
To allow multiple specific IPs, you simply repeat the sudo ufw allow from [IP_ADDRESS] command for each IP. For example, to allow 192.168.1.10 and 192.168.1.11, you would run two separate commands. Each command adds a new rule to your UFW configuration. This is the most straightforward way to implement multiple ufw allow specific ip rules.
What’s the difference between ‘ufw allow from’ and ‘ufw allow to’?
ufw allow from [SOURCE_IP] permits incoming connections from that source IP to any port on your server. Conversely, ufw allow to [DESTINATION_IP] permits outgoing connections from your server to that destination IP. Most server security focuses on incoming traffic, so ‘allow from’ is more commonly used. However, ‘allow to’ is useful for restricting outbound connections.
Is it safer to deny all and allow specific IPs, or allow all and deny specific?
It is overwhelmingly safer to deny all incoming traffic by default and then explicitly allow specific IPs or ports. This is known as a “whitelisting” approach. By contrast, allowing all and denying specific (blacklisting) is less secure because it relies on you knowing and blocking every potential threat. The deny-all-then-allow strategy minimizes your attack surface significantly.
How do I troubleshoot if my UFW allow rule isn’t working?
First, check UFW’s status with sudo ufw status verbose to ensure the rule is listed correctly. Verify the IP address, port, and direction. Second, check your application’s logs to see if connection attempts are being made and rejected. Third, ensure UFW is enabled. Finally, remember that UFW processes rules in order; an earlier ‘deny’ rule might be overriding your ‘allow’ rule. You may need to delete and re-add rules in a specific sequence.
Can UFW protect against DDoS attacks by allowing specific IPs?
While allowing specific IPs with UFW can limit access to your services, it offers limited protection against sophisticated Distributed Denial of Service (DDoS) attacks. DDoS attacks often involve overwhelming traffic from numerous sources, not just a few specific IPs. UFW can help mitigate simpler attacks by blocking known malicious IPs or ranges. However, for large-scale DDoS, you typically need specialized DDoS mitigation services. These services operate at a higher network layer to filter traffic before it reaches your server.
Conclusion: Fortify Your Server with UFW IP Rules
Implementing precise firewall rules is a cornerstone of robust server security. By learning how to ufw allow specific ip addresses, you gain invaluable control over who can access your services. This proactive approach significantly reduces the risk of unauthorized intrusions and data breaches. Remember that security is an ongoing process, not a one-time setup. Therefore, regular review and updates of your firewall rules are essential.
Recap of UFW IP Filtering Benefits for Security
UFW’s IP filtering capabilities offer numerous benefits. They create a strong perimeter defense, allowing only trusted entities to connect. This reduces the attack surface, making your server less vulnerable to scanning and brute-force attempts. Furthermore, it simplifies security management with its intuitive command structure. Ultimately, precise IP whitelisting enhances overall system integrity and data protection.
Best Practices for UFW Rule Management
Always adopt a “deny by default, allow by exception” policy. Document your UFW rules thoroughly, noting their purpose and creation date. Regularly review your rules and remove any that are no longer necessary. Test new rules in a staging environment if possible before deploying to production. Additionally, combine IP-based rules with port-specific rules for maximum security. Consider using a tool like Fail2Ban alongside UFW for automated IP blocking.
Final Call to Action: Implement UFW for Robust Server Security
Don’t leave your server exposed to unnecessary risks. Take action today to implement UFW and configure specific IP allowances. Start by enabling UFW, then add rules for your essential services like SSH and web servers. Regularly monitor your firewall status and adapt your rules as your network environment evolves. A strong UFW configuration is a vital component of any secure server. Begin fortifying your digital assets now.