Automating routine tasks is a cornerstone of efficient system administration and development. Whether you’re a seasoned developer or just starting with server management, understanding how to automate repetitive commands is crucial. This guide will walk you through the process of scheduling a cron job, a powerful utility that ensures your scripts and commands run exactly when you need them to, without manual intervention.
See also: Complete Guide to Cron, Cron Job Syntax: Mastering Crontab Scheduling, How to Create, Edit, and Delete Cron Jobs, Resolving Cron Job Environment Variable and PATH Issues, Troubleshooting Cron Jobs: Why Your Scheduled Tasks Aren't Running.What is a Cron Job and Why Use It?
A cron job is simply a scheduled command that runs at a specific time or interval on a Unix-like operating system. Think of it as your server’s personal assistant, ready to execute tasks like backups, updates, or custom scripts automatically. This utility is indispensable for maintaining system health, managing data, and ensuring applications run smoothly without constant human oversight.
The primary benefit of using cron jobs lies in their ability to automate mundane and time-consuming administrative tasks. By scheduling a cron job, you free up valuable time and reduce the potential for human error that can occur with manual execution. This automation ensures consistency, allowing you to set up tasks once and have them reliably run in the background, making your systems more robust and efficient.
Common uses for cron jobs include automating database backups, cleaning up temporary files, sending out scheduled reports, checking website uptime, or even running custom scripts for data processing. Its flexibility makes it a fundamental tool for anyone managing servers or applications that require periodic operations. Learning to effectively use cron jobs is a key skill for any system administrator or developer.
Demystifying Cron Syntax: The Crontab Format Explained
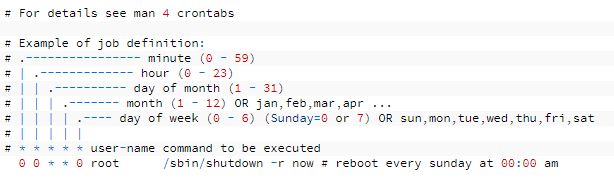
The heart of scheduling a cron job lies in understanding the crontab syntax. Each cron entry, often called a “crontab expression,” consists of five time-and-date fields followed by the command to be executed. These fields specify precisely when your command will run, allowing for incredible granularity in scheduling.
The five fields represent:
- Minute (0-59): The specific minute of the hour.
- Hour (0-23): The specific hour of the day (24-hour format).
- Day of Month (1-31): The specific day of the month.
- Month (1-12 or Jan-Dec): The specific month of the year.
- Day of Week (0-7 or Sun-Sat): The specific day of the week (0 and 7 both represent Sunday).
You can use special characters within these fields to define more complex schedules. An asterisk (``) means “every” possible value for that field. A comma (`,`) separates multiple values (e.g., `1,15` for the 1st and 15th). A hyphen (`-`) denotes a range (e.g., `9-17` for hours 9 AM through 5 PM). Finally, a slash (`/`) specifies step values (e.g., `/15` for “every 15 minutes”). Mastering these characters allows you to create highly customized schedules for your automated tasks.

Step-by-Step Guide to Scheduling Your First Cron Job
To begin scheduling a cron job, you’ll interact with the `crontab` command-line utility. This tool allows you to view, edit, and manage your scheduled tasks. The process is straightforward, but attention to detail is essential to ensure your jobs run as expected.
1. Access Your Crontab
Open your terminal and type `crontab -e`. This command opens your personal crontab file in a text editor (usually `vi` or `nano`). If it’s your first time, it might ask you to choose an editor. This file contains all the cron jobs associated with your user account. Be careful when editing, as syntax errors can prevent all your cron jobs from running.
2. Add Your Cron Entry
At the bottom of the file, add a new line following the cron syntax. For example, to run a script named `backup.sh` located in your home directory every day at 3:00 AM, you would add:
0 3 * /home/yourusername/backup.sh >> /var/log/backup.log 2>&1
3. Save and Verify
After adding your cron entry, save the file and exit the editor. Cron will usually notify you that “crontab: installing new crontab” if successful. To verify your new cron job is listed, you can run `crontab -l`. This command will display all the cron jobs currently scheduled for your user. If you encounter issues, double-check your syntax and ensure the script has executable permissions (`chmod +x script.sh`).
Advanced Tips and Best Practices for Cron Job Management
While the Basic steps for scheduling a cron job are simple, adopting best practices can significantly improve reliability and maintainability. Properly managing your cron jobs helps prevent unexpected issues and makes debugging much easier when problems arise.
1. Use Absolute Paths
Always specify the full path to your script or executable (e.g., `/usr/local/bin/myscript.sh` instead of `myscript.sh`). Cron jobs run with a very limited `PATH` environment variable, meaning they won’t automatically find executables that are in your user’s typical `PATH`. Similarly, use absolute paths for any files or directories your script interacts with.
2. Redirect Output and Log Everything
It’s crucial to redirect the output of your cron jobs, especially for long-running or critical tasks. By default, cron will attempt to email any output (both standard output and standard error) to the user who owns the crontab. While useful, this can flood your inbox. Instead, redirect output to a log file:
* /path/to/your/script.sh >> /var/log/my_cron_job.log 2>&1
3. Handle Errors Gracefully
Design your scripts to include error handling. For instance, if a script fails, it should exit with a non-zero status code. You can also configure cron to send email notifications only when an error occurs, by wrapping your command in a conditional statement or using specialized tools. For more in-depth information on error handling and cron best practices, you can refer to resources like Wikipedia’s Cron page.
4. Set the SHELL and PATH Environment Variables
If your script relies on specific shell features or executables located outside the default cron `PATH`, you can define these at the top of your crontab file:
SHELL=/bin/bash
PATH=/usr/local/sbin:/usr/local/bin:/usr/sbin:/usr/bin:/sbin:/bin
0 0   * /path/to/your/script.sh