Navigating the Linux command line efficiently is a fundamental skill for any user, from beginners to seasoned administrators. Among the powerful tools available, the Pushd and Popd Commands in Linux stand out for their ability to streamline directory navigation. These commands allow you to manage a stack of directories, making it incredibly simple to switch between frequently accessed locations without typing long paths repeatedly. Before diving in, let’s clarify what Pushd and Popd Commands in Linux actually means and how they can significantly boost your productivity.
Introduction to Pushd and Popd Commands in Linux
The `pushd` and `popd` commands are indispensable utilities in the Linux shell environment. They are designed to simplify the process of moving between different directories, particularly when you need to jump back and forth between several locations. Understanding these commands is crucial for anyone looking to master command-line efficiency and reduce repetitive typing.
What are Pushd and Popd?
At their core, `pushd` and `popd` manipulate a concept known as the directory stack. Think of this stack as a memory of your recent directory locations. The `pushd` command “pushes” a new directory onto this stack while simultaneously changing your current working directory to that new location. Conversely, `popd` “pops” a directory off the top of the stack, returning you to the directory that was previously active.
Why Efficient Directory Navigation is Crucial
Efficient directory navigation saves considerable time and effort, especially in complex project structures or when working with multiple repositories. Manually typing `cd /path/to/project/sub/directory` repeatedly can be tedious and prone to errors. Therefore, mastering tools like the Pushd and Popd Commands in Linux becomes essential for maintaining focus and workflow.
The Concept of the Directory Stack
The directory stack is a Last-In, First-Out (LIFO) data structure. This means the last directory you push onto the stack will be the first one you pop off. This mechanism provides a logical and predictable way to manage your navigational history within the shell. It’s a powerful feature often overlooked by many Linux users.
Understanding the Linux Directory Stack and `dirs` Command
To effectively use `pushd` and `popd`, you must first understand the directory stack itself. This stack is a dynamic list maintained by your shell, such as bash or Zsh. It keeps track of the directories you’ve added, allowing for quick recall and traversal.
How the Directory Stack Works
When you use `pushd`, the current directory is first added to the stack, and then you move to the new specified directory. This new directory then becomes the top of the stack. When you use `popd`, the top directory is removed, and your shell automatically navigates to the new top directory. This creates a seamless back-and-forth movement.
Viewing Stack Contents with `dirs`
The `dirs` command is your window into the directory stack. Typing `dirs` without any arguments will display the entire contents of your current directory stack. The leftmost directory is always your current working directory, followed by the directories lower down the stack. For instance:
- `dirs` shows: `~/projectA ~/docs ~/scripts`
- Here, `~/projectA` is your current directory.
- `~/docs` is the next directory on the stack.
- `~/scripts` is the last one added.
This simple command provides immediate feedback on your navigational history. You can also use `dirs -v` for a numbered list, which is particularly helpful for larger stacks.
Manipulating the Stack Index
The `dirs` command can also show indices for each directory in the stack. These indices are crucial for advanced navigation with `pushd` and `popd`. The current directory is always index `0`, the next is `1`, and so on. Understanding these indices allows for non-sequential jumps within your directory history, offering greater flexibility. Furthermore, you can use negative indices to count from the right end of the stack.
Mastering the `pushd` Command for Directory Management
The `pushd` command is the primary tool for adding directories to your stack and simultaneously changing your location. It offers several powerful ways to manage your working environment, making it a cornerstone of efficient command-line usage. Understanding its various forms is key to leveraging its full potential.
Basic-syntax-and-usage-of-pushd">Basic Syntax and Usage of `pushd`
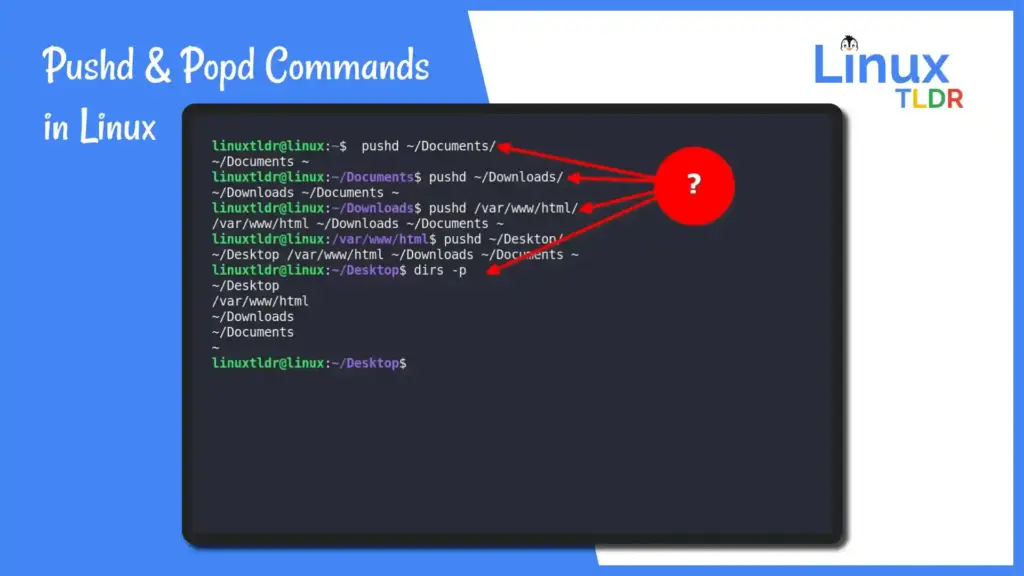
The most common way to use `pushd` is to simply provide a directory path as an argument. For example, `pushd /var/log` will add `/var/log` to the stack and change your current directory to `/var/log`. If no argument is given, `pushd` will swap the top two directories on the stack, effectively taking you back to the previous directory. This behavior is similar to `cd -` but also updates the stack.
Adding Directories to the Stack
You can add multiple directories to the stack sequentially. Each time you use `pushd` with a new path, that path becomes the new current directory, and the previous current directory is pushed further down the stack. This builds up your navigational history, ready for quick access. Consider this sequence:
- `pwd` (outputs `/home/user`)
- `pushd /etc` (stack: `/etc /home/user`)
- `pushd /var/log` (stack: `/var/log /etc /home/user`)
- `pushd /tmp` (stack: `/tmp /var/log /etc /home/user`)
This demonstrates how the stack grows with each `pushd` operation. The Pushd and Popd Commands in Linux work in tandem to manage this stack efficiently.
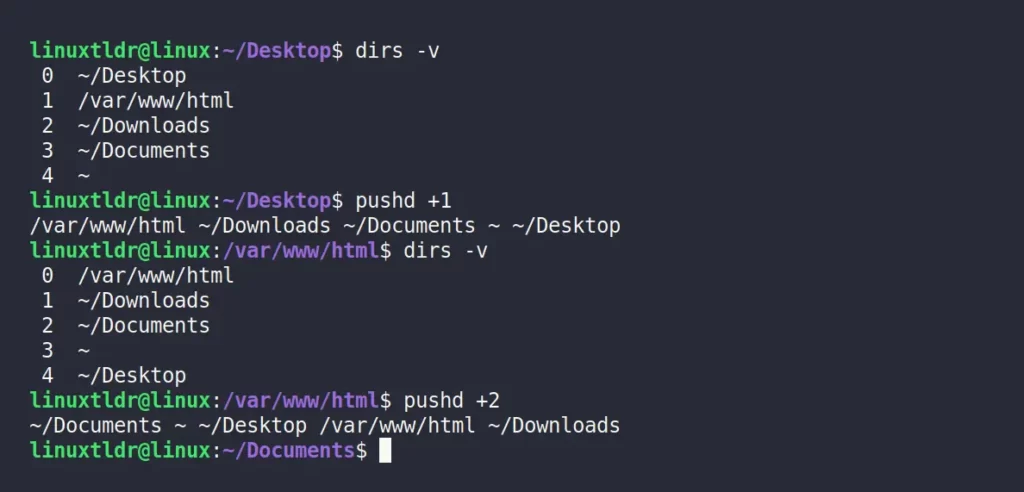
Navigating the Stack with `pushd +N` and `pushd -N`
Beyond simply adding new directories, `pushd` allows you to rotate through existing directories in the stack. Using `pushd +N` rotates the Nth directory (from the left, starting at 0) to the top of the stack, making it the current directory. Similarly, `pushd -N` rotates the Nth directory from the right (starting at 0) to the top. This provides a quick way to jump to specific, previously visited locations without knowing their full paths. For example, `pushd +1` will make the second directory in your `dirs` output your current directory.
Effective Use of the `popd` Command in Linux
While `pushd` adds directories, `popd` is responsible for removing them from the stack and changing your current directory accordingly. It’s the counterpart that allows you to gracefully backtrack through your navigational history. Understanding `popd` completes your mastery of the Pushd and Popd Commands in Linux.
Basic Syntax and Usage of `popd`
The simplest way to use `popd` is without any arguments. When executed this way, `popd` removes the top directory from the stack and changes your current directory to the new top of the stack. This is ideal for simply going “back” one level in your stack history. If the stack becomes empty, `popd` will typically return an error or simply do nothing, depending on your shell configuration.
Removing Directories from the Stack
Each call to `popd` reduces the size of your directory stack by one. This systematic removal helps you clean up your navigational history as you complete tasks in specific directories. It ensures that your stack remains relevant to your current workflow. For instance, if your stack is `/tmp /var/log /etc`, then `popd` will make `/var/log` your current directory and the stack will become `/var/log /etc`.
Targeted Removal with `popd +N` and `popd -N`
Just like `pushd`, `popd` also supports indexed arguments for more precise control. Using `popd +N` removes the Nth directory from the left of the stack (starting at 0) without changing your current directory. Similarly, `popd -N` removes the Nth directory from the right. This is particularly useful for cleaning up specific entries in a crowded stack without disrupting your immediate working location. For example, `popd +2` would remove the third directory listed by `dirs` from the stack.
Practical Applications and Advanced Techniques for Pushd and Popd
The utility of `pushd` and `popd` extends far beyond basic directory switching. Integrating these commands into your daily workflow can significantly enhance productivity, especially for complex tasks. They are invaluable for managing multiple projects simultaneously and for scripting automated navigation.
Streamlining Multi-Project Workflows
Imagine working on three different projects, each in a separate, deeply nested directory. Instead of `cd`ing back and forth, you can use `pushd` to quickly jump between them. Push each project’s root directory onto the stack once. Then, use `pushd +1`, `pushd +2`, or `pushd +3` to effortlessly switch between them. This approach keeps your current context readily available, reducing mental overhead.
- Quickly switch between project directories.
- Maintain a history of frequently accessed locations.
- Reduce typing and potential path errors.
Scripting with Directory Stack Commands
The Pushd and Popd Commands in Linux are perfect for shell scripts that need to temporarily change directories and then return. A script can `pushd` into a specific directory to perform operations, and then `popd` to return to the original location. This ensures the script is non-intrusive to the user’s current shell session. For example:
#!/bin/bash
pushd /tmp > /dev/null
ls -l
popd > /dev/null
echo "Returned to original directory."
The `> /dev/null` suppresses the output of `pushd` and `popd` to keep the script’s output clean.
Comparing with `cd -` and Aliases
While `cd -` is useful for switching between the current and previous directory, it only remembers one previous location. `pushd` and `popd` offer a full stack of directories. Furthermore, you can create aliases for common `pushd` commands, such as `alias proj1=’pushd ~/projects/my_first_project’`. This combines the power of the directory stack with personalized shortcuts, further enhancing your command-line efficiency. For more advanced shell scripting techniques, you can refer to the Bash Reference Manual.
Frequently Asked Questions about Pushd and Popd Commands in Linux
What is the maximum size of the directory stack?
The maximum size of the directory stack is generally limited by your system’s memory and shell configuration, rather than a fixed hard limit. In most practical scenarios, you won’t encounter a limit. However, managing a stack with too many entries can become cumbersome, so it’s best to keep it relevant to your current tasks.
How can I clear the directory stack?
You can clear the entire directory stack by using the `dirs -c` command. This will empty the stack, leaving only your current working directory. It’s a useful command for resetting your navigational history when you start a new set of tasks or find your stack cluttered.
Do `pushd` and `popd` work in all Linux shells?
Yes, `pushd` and `popd` are standard built-in commands in most modern Unix-like shells, including Bash, Zsh, and Ksh. Their behavior and syntax are largely consistent across these shells, making them reliable tools regardless of your preferred command-line environment.
Conclusion: Enhancing Your Linux Productivity with Pushd and Popd
Mastering the Pushd and Popd Commands in Linux is a significant step towards becoming a more efficient and productive command-line user. These powerful utilities provide a sophisticated way to manage your directory navigation, moving beyond the limitations of simple `cd` commands. By leveraging the directory stack, you can effortlessly switch between projects, streamline complex workflows, and write more robust shell scripts.
Summary of Key Benefits
The benefits of integrating `pushd` and `popd` into your routine are clear. You gain speed, reduce errors, and maintain a cleaner, more organized command-line environment. These commands are not just about changing directories; they are about changing how you interact with your Linux system, making it more intuitive and powerful.
Call to Action: Practice and Integrate
We encourage you to start experimenting with `pushd`, `popd`, and `dirs` today. Begin by adding a few frequently used directories to your stack, then practice navigating between them. The more you use these commands, the more natural and indispensable they will become. Integrate them into your daily workflow to unlock a new level of command-line mastery.
Further Resources for Command-Line Mastery
To further enhance your Linux command-line skills, explore other powerful tools like `find`, `grep`, and `xargs`. Many online tutorials and documentation exist to help you delve deeper into shell scripting and advanced command usage. Continuous learning is key to becoming a true Linux expert.