Are you looking to install Python 3.12 Ubuntu to leverage its latest features and performance improvements? This comprehensive guide will walk you through the precise steps needed to successfully set up Python 3.12 on your Ubuntu system. Python 3.12, released by the Python Software Foundation, introduces significant enhancements for developers. Furthermore, having the most current version ensures better compatibility with modern libraries and frameworks, making your development workflow smoother and more efficient.
Introduction: Why Install Python 3.12 on Ubuntu?
Python 3.12 brings a host of new features, including improved error messages and enhanced f-string capabilities. Developers often need the latest Python version for specific project requirements or to take advantage of performance optimizations. Therefore, understanding how to install Python 3.12 on Ubuntu is crucial for staying current in the fast-evolving world of software development. This guide will cover two primary methods to achieve this installation.
Benefits of Python 3.12 for Ubuntu Users
Upgrading to Python 3.12 offers several compelling advantages for developers working on Ubuntu. Firstly, it provides access to the newest language syntax and standard library modules. Additionally, performance improvements mean your scripts and applications will run faster and more efficiently. This can be particularly beneficial for data science, web development, and automation tasks.
- Enhanced Performance: Python 3.12 includes various internal optimizations.
- New Features: Access to the latest syntax and library additions.
- Improved Error Messages: Easier debugging for a smoother development experience.
- Modern Compatibility: Better support for contemporary libraries and frameworks.
Preparing Your Ubuntu System for Python 3.12 Installation
Before you proceed to install Python 3.12 Ubuntu, it is essential to prepare your system correctly. This involves updating your package lists and installing necessary build tools. Proper preparation prevents common installation errors and ensures a stable environment. Following these preliminary steps will significantly streamline the entire process.
Updating System Packages and Repositories
Always begin by updating your Ubuntu system’s package index and upgrading existing packages. This ensures you have the latest versions of system components and dependencies. Open your terminal and execute the following commands:
sudo apt update
sudo apt upgrade -y
These commands refresh the list of available packages and install any pending updates. Consequently, your system will be in the best state for new software installations.
Installing Essential Build Dependencies
To compile Python from source or to ensure the PPA method works flawlessly, you need several development tools. These dependencies are crucial for building software packages on Linux systems. Install them using the command below:
sudo apt install software-properties-common build-essential libssl-dev libffi-dev python3-dev python3-pip -yThis command installs compilers, development libraries, and `pip` for Python 3. Consequently, your system will be ready for the Python 3.12 installation.
Understanding Existing Python Versions on Ubuntu
Ubuntu typically comes with Python 3 pre-installed, often Python 3.8 or 3.10, depending on your Ubuntu version. It is crucial not to remove or modify this system Python, as many core system utilities rely on it. Our goal is to install Python 3.12 alongside the existing version, allowing you to manage multiple Python environments effectively. This approach ensures system stability while providing access to the newest Python release.
Method 1: Install Python 3.12 on Ubuntu Using PPA (Recommended)
The easiest and most recommended way to install Python 3.12 Ubuntu is by using a Personal Package Archive (PPA). The Deadsnakes PPA is a well-maintained repository that provides newer Python versions for Ubuntu. This method simplifies the installation process significantly, handling dependencies and updates automatically. Therefore, it is ideal for most users seeking a straightforward setup.
Adding the Deadsnakes PPA Repository
First, you need to add the Deadsnakes PPA to your system’s list of repositories. This step allows your package manager to find and install Python 3.12. Execute the following command in your terminal:
sudo add-apt-repository ppa:deadsnakes/ppa -yAfter adding the PPA, update your package lists again to include the new repository’s packages. This ensures that the system recognizes Python 3.12 as an available installation option. You can find more details about the PPA on its Launchpad page: Deadsnakes PPA.
sudo apt updateInstalling Python 3.12 Core Packages
With the PPA added and updated, you can now install Python 3.12 directly. This command fetches the core Python interpreter and its essential components. Run the following in your terminal:
sudo apt install python3.12 -yThis command will download and install Python 3.12, placing it in `/usr/bin/python3.12`. It is a quick and efficient way to get the latest Python version on your system. Consequently, you will have a fully functional Python 3.12 interpreter ready for use.
Installing Python 3.12 Development Headers and venv Module
For development purposes, you will likely need the Python 3.12 development headers and the `venv` module. The development headers are essential for compiling Python extensions, while `venv` allows you to create isolated virtual environments. Install them with this command:
sudo apt install python3.12-dev python3.12-venv -yInstalling these packages ensures you have all the necessary tools for robust Python development. Furthermore, using virtual environments is a best practice for managing project dependencies, preventing conflicts between different projects.
Method 2: Compile and Install Python 3.12 from Source on Ubuntu
While the PPA method is generally preferred, compiling Python 3.12 from source offers greater control over the installation process. This method is particularly useful if you need specific compilation flags or want to install Python in a custom location. It also ensures you have the absolute latest release directly from the Python Software Foundation. However, it requires more manual steps and attention to detail.
Downloading Python 3.12 Source Code
First, navigate to a directory where you want to download the source code, such as your home directory or `/opt`. Then, download the official Python 3.12 source tarball from the Python website. Use `wget` to retrieve the file and `tar` to extract it:
cd /opt
sudo wget https://www.python.org/ftp/python/3.12.2/Python-3.12.2.tgz
sudo tar -xf Python-3.12.2.tgz
cd Python-3.12.2
Always verify the latest stable release version on the official Python website before downloading. This ensures you are working with the most current and secure source code available.
Configuring and Compiling Python 3.12
Once inside the extracted directory, configure the build process. The `–enable-optimizations` flag significantly improves Python’s performance. Next, compile the source code using `make`:
sudo ./configure --enable-optimizations
sudo make -j $(nproc)
The `make -j $(nproc)` command utilizes all available CPU cores for faster compilation. This step can take a few minutes, depending on your system’s processing power. Patience is key during this phase of the installation.
Installing Python 3.12 to a Custom Location
Finally, install Python 3.12. It’s recommended to use `make altinstall` to prevent overwriting the default system Python binaries. This command installs Python 3.12 alongside your existing Python versions without affecting system integrity:
sudo make altinstallAfter installation, you can remove the downloaded source files to free up disk space. This completes the source installation process, providing a custom-built Python 3.12 environment.
Verifying Your Python 3.12 Installation on Ubuntu
After you install Python 3.12 Ubuntu, it is crucial to verify that the installation was successful. This ensures that the interpreter is correctly configured and accessible on your system. Proper verification prevents potential issues when you start developing with the new Python version. Follow these steps to confirm everything is working as expected.
Checking Python 3.12 Version
To confirm that Python 3.12 is installed and accessible, open your terminal and type the specific version command. This command should output the exact version number of Python 3.12:
python3.12 --versionYou should see output similar to `Python 3.12.2`. If you installed from source, ensure you used `altinstall` to avoid conflicts with `python3`. This simple check is the first step in confirming a successful installation.
Confirming Pip for Python 3.12
Every Python installation needs its corresponding package installer, `pip`. It is essential to verify that `pip` for Python 3.12 is correctly installed and linked. Use the following command to check its version:
pip3.12 --versionThis should display the `pip` version associated with Python 3.12. If `pip3.12` is not found, you might need to install it specifically using `sudo apt install python3.12-pip` (for PPA) or by ensuring it was included in your source build. Having the correct `pip` is vital for managing project dependencies efficiently.
Creating a Virtual Environment with Python 3.12
Creating a virtual environment is a best practice for Python development, isolating project dependencies. To test your new Python 3.12 installation, create and activate a virtual environment:
- Create a project directory: `mkdir my_python_project && cd my_python_project`
- Create the virtual environment: `python3.12 -m venv venv`
- Activate the environment: `source venv/bin/activate`
- Verify Python version inside venv: `python –version` (should show Python 3.12)
This process confirms that your Python 3.12 installation is fully functional and ready for development. Remember to deactivate the environment using `deactivate` when you are finished.
Managing Python Versions and Default Aliases on Ubuntu
Having multiple Python versions on your Ubuntu system is common, but managing them effectively is key. You might want to set Python 3.12 as your default for new projects, or switch between versions for different tasks. Understanding how to manage these aliases ensures a smooth development workflow. This section will guide you through best practices for handling multiple Python installations.
Setting Python 3.12 as Default (Optional)
While generally not recommended for system-wide changes, you can set Python 3.12 as the default `python3` command using `update-alternatives`. However, proceed with caution, as this can impact system scripts. If you must, use the following commands:
sudo update-alternatives --install /usr/bin/python3 python3 /usr/bin/python3.12 1
sudo update-alternatives --config python3
Select the entry for Python 3.12 from the list. Always be mindful of potential conflicts with system utilities when altering default Python aliases. It is usually safer to use explicit version calls or virtual environments.
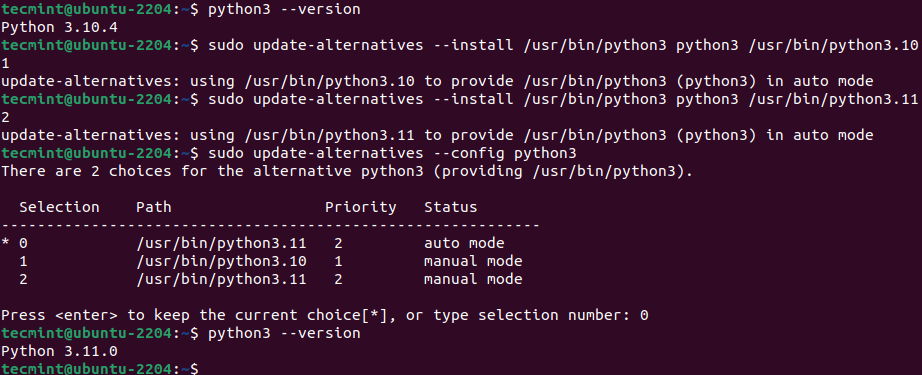
Using ‘update-alternatives’ for Python Management
The `update-alternatives` tool is powerful for managing symbolic links to different versions of commands. You can register multiple Python versions and easily switch between them. This provides flexibility without manually changing `PATH` variables. For instance, you could add Python 3.10 and 3.12:
sudo update-alternatives --install /usr/bin/python3 python3 /usr/bin/python3.10 2
sudo update-alternatives --install /usr/bin/python3 python3 /usr/bin/python3.12 1
Then, `sudo update-alternatives –config python3` lets you choose your preferred default. This method is robust for managing system-wide Python aliases.
Reverting to System Python (if needed)
If you encounter issues after changing the default Python version, you can easily revert. Use `sudo update-alternatives –config python3` again and select your original system Python version (e.g., Python 3.10). Alternatively, you can remove the Python 3.12 entry:
sudo update-alternatives --remove python3 /usr/bin/python3.12This ensures your system returns to its stable configuration. Always prioritize system stability, especially on production servers. Virtual environments remain the safest approach for project-specific Python versions.
Troubleshooting Common Python 3.12 Installation Issues
Even with careful steps, you might encounter issues when you install Python 3.12 Ubuntu. Knowing how to troubleshoot these common problems can save you significant time and frustration. This section addresses some of the most frequent hurdles and provides practical solutions. Addressing these issues promptly ensures a smoother development experience.
Dependency Errors During Compilation
When compiling from source, you might see errors related to missing libraries (e.g., `zlib`, `readline`). This usually means you missed some build dependencies. Revisit the “Installing Essential Build Dependencies” section and ensure all packages are installed. Specifically, look for `libssl-dev`, `libffi-dev`, `libreadline-dev`, and `zlib1g-dev`. Installing these often resolves most compilation failures.
PATH Variable Configuration Problems
If `python3.12` or `pip3.12` commands are not found after installation, it’s likely a `PATH` variable issue. Ensure that `/usr/local/bin` (for source installs) or `/usr/bin` (for PPA installs) is included in your system’s `PATH`. You can check your `PATH` with `echo $PATH`. If needed, add the correct directory to your `~/.bashrc` or `~/.profile` file: `export PATH=”/usr/local/bin:$PATH”`. Remember to `source ~/.bashrc` after making changes.
Permissions Issues and Solutions
Sometimes, you might face permission errors, especially when installing from source or trying to modify system directories. Always use `sudo` for commands that require root privileges, such as `apt install` or `make install`. If you encounter errors while trying to write to a directory, check its ownership and permissions using `ls -l`. Adjusting permissions with `sudo chmod` or `sudo chown` might be necessary, but exercise caution when modifying system files.
Frequently Asked Questions About Installing Python 3.12 on Ubuntu
Many users have similar questions when considering how to install Python 3.12 Ubuntu. This FAQ section aims to address the most common concerns, providing clear and concise answers. Understanding these points will help you make informed decisions about your Python setup. We cover topics from the benefits of upgrading to managing multiple versions.
Why should I install Python 3.12 on Ubuntu?
You should install Python 3.12 on Ubuntu to access the latest language features, performance improvements, and enhanced debugging tools. This version offers better compatibility with modern libraries and frameworks, ensuring your development projects are future-proof. Furthermore, staying updated helps you leverage the newest advancements from the Python Software Foundation. It also provides a more robust and efficient coding environment for various applications.
Can I have multiple Python versions on Ubuntu?
Yes, you can absolutely have multiple Python versions installed on Ubuntu simultaneously. In fact, it’s a common and recommended practice for developers. Ubuntu’s system utilities rely on a specific Python version, so installing newer versions alongside it is crucial. Using tools like `update-alternatives` or, more commonly, virtual environments (`venv`), allows you to manage and switch between different Python versions for various projects without conflicts. This flexibility is a cornerstone of modern Python development.
How do I uninstall Python 3.12 from Ubuntu?
To uninstall Python 3.12 from Ubuntu, the method depends on how you installed it. If you used the Deadsnakes PPA, you can remove it with `sudo apt remove python3.12 python3.12-dev python3.12-venv -y`. Then, you might want to remove the PPA itself using `sudo add-apt-repository –remove ppa:deadsnakes/ppa`. If you compiled from source, you would typically navigate to the source directory and run `sudo make uninstall`, though this depends on the installation method. Always be careful not to remove the system’s default Python version.
Conclusion: Successfully Install Python 3.12 on Ubuntu
You have now learned how to successfully install Python 3.12 Ubuntu using both the recommended PPA method and by compiling from source. This guide covered essential preparation steps, detailed installation instructions, and crucial verification processes. By following these steps, you can confidently leverage Python 3.12’s powerful new features for your development projects. Remember to utilize virtual environments for optimal project management and to prevent dependency conflicts.
Embracing the latest Python version on your Ubuntu system opens up new possibilities for efficient and modern development. We encourage you to start exploring Python 3.12’s capabilities today. If you encountered any issues or have further questions about how to install Python 3.12 on Ubuntu, please feel free to leave a comment below. Share your experiences and help others in the community!
One thought on “How To Install Python 3.12 Ubuntu: A Complete Guide”