Understanding how to set Git username and email is a fundamental step for anyone working with version control. Properly configuring your Git identity ensures that your contributions are correctly attributed within every project. This guide will walk you through the essential commands and best practices to set up your Git username and email effectively, preventing common attribution issues.
Understanding How to Set Git Username and Email: Why It Matters
Setting your Git username and email is crucial for maintaining a clear and accurate commit history. Git uses this information to label every change you make to a repository. Without proper configuration, your commits might appear anonymous or be attributed incorrectly, which can cause confusion in team environments. Therefore, taking a few moments to set this up correctly is highly beneficial.
The Role of Git Identity in Version Control
Your Git identity acts as your signature on every change you submit. It links your work directly to you, providing transparency and accountability within a project’s history. This identity is stored locally on your machine, not on a remote server like GitHub or GitLab. Consequently, you must configure it on each system where you plan to use Git for development.
How Git Uses Your User Information for Commits
Every time you create a commit, Git records the author’s name and email address. This metadata is permanently embedded within the commit object. It allows team members to easily see who made specific changes and when. Furthermore, this information is vital for tracking contributions and understanding the evolution of a codebase over time.
Importance for Collaboration and Attribution
In collaborative projects, accurate attribution is paramount. It helps teams track individual contributions and facilitates code reviews. If your Git identity is incorrect, your commits might not link to your profile on platforms like GitHub. This can lead to difficulties in recognizing your work and managing project permissions. Therefore, ensuring correct settings is a professional courtesy.
Step-by-Step Guide: How to Set Git Username and Email Globally
Configuring your Git identity globally means these settings will apply to all repositories on your system by default. This is the most common and recommended approach for individual developers. However, you can always override these global settings for specific projects if needed. Let’s explore the commands to achieve this.
Configuring Global Git Settings via the command line
The command line is your primary tool for interacting with Git. You will use the `git config` command to manage all your Git settings. For global configurations, you simply add the `–global` flag. This ensures the settings are saved in your user’s home directory, typically in a file named `.gitconfig`.
- Open your terminal or command prompt.
- Execute the commands provided below for both username and email.
- Verify your settings afterward to confirm they were applied correctly.

Syntax for `git config –global user.name`
To set your global username, use the following command. Replace “Your Name” with your actual name. It is generally recommended to use your full name or the name you use for professional identification. This name will appear next to your commits.
git config --global user.name "Your Name"
For example, if your name is Jane Doe, you would type: git config --global user.name "Jane Doe". This command instantly updates your global Git configuration file. Remember to enclose your name in double quotes if it contains spaces.
Syntax for `git config –global user.email`
Similarly, to set your global email address, use this command. Replace “[email protected]” with the email address you wish to associate with your Git commits. This email should ideally match the one linked to your GitHub or GitLab account for seamless integration.
git config --global user.email "[email protected]"
For instance, if your email is [email protected], you would enter: git config --global user.email "[email protected]". This email is crucial for platforms to link your commits to your user profile. Always double-check for typos before pressing enter.
Configuring Git Username and Email for a Specific Repository
Sometimes, you might need to use a different identity for a particular project. This is common when working on client projects or personal side projects that require a separate email address. Git allows you to override global settings at the repository level. These local settings take precedence over global ones.
Overriding Global Settings for Local Projects
Local configurations are stored within the `.git/config` file of a specific repository. They only affect that single repository and do not impact any other projects on your system. This flexibility is invaluable for managing diverse development contexts. It ensures your global settings remain untouched.
This approach is particularly useful for open-source contributions where you might use a public email. Conversely, for work projects, you might use your corporate email. Understanding this hierarchy helps maintain proper attribution across all your development efforts.
Steps to Set Local Git User Identity
To set your username and email for a specific repository, navigate into that repository’s directory first. Then, execute the `git config` commands without the `–global` flag. The absence of this flag tells Git to apply the changes only to the current repository.
- Navigate to your project directory using the terminal:
cd /path/to/your/repo. - Set your local username:
git config user.name "Project Specific Name". - Set your local email:
git config user.email "[email protected]".
These commands will update the `.git/config` file within that specific repository. Always confirm your settings after making changes to ensure accuracy. This prevents accidental misattribution in your project history.
When to Use Local vs. Global Git Configuration
Use global configuration when you want a consistent identity across all your Git projects. This is ideal for personal development or when all your work falls under one professional identity. It simplifies management significantly. It is the default and most convenient setup for most users.
Conversely, opt for local configuration when a project requires a distinct identity. This scenario often arises in freelance work, open-source contributions, or when juggling multiple professional roles. It provides the necessary flexibility without altering your primary Git identity. Always consider the context of your project.
Verifying Your Git Username and Email Settings
After setting your Git username and email, it’s essential to verify that the changes were applied correctly. This step helps prevent future attribution issues and ensures your commits are properly linked. Git provides simple commands to inspect your current configuration settings at both global and local levels.
Checking Global Git Configuration
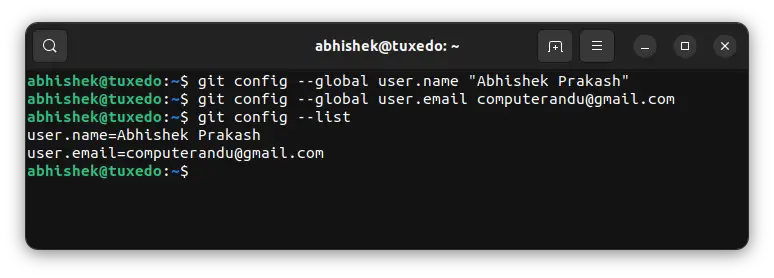
To view your globally configured username and email, use the `git config –global` command with the `–list` flag. This will display all global settings stored in your `.gitconfig` file. Look for the `user.name` and `user.email` entries in the output.
git config --global --list
Alternatively, you can query specific settings directly:
git config --global user.name
git config --global user.email
These commands will output only the value of the requested setting. This is useful for quickly confirming a single piece of information. If no output appears, the setting may not be defined globally.
Checking Local Repository Git Configuration
To check the settings for your current repository, navigate into the project directory. Then, use the `git config –list` command without the `–global` flag. This will show all local settings, which override global ones. Always verify local settings when working on specific projects.
git config --list
Similar to global checks, you can query specific local settings:
git config user.name
git config user.email
If a local setting is not defined, Git will fall back to the global setting. Therefore, checking both levels provides a complete picture of your effective Git identity for any given repository. This ensures accurate commit attribution.
Understanding Git Configuration Files (.gitconfig)
Git stores your configuration settings in plain text files. The global settings are typically found in `~/.gitconfig` (on Linux/macOS) or `%USERPROFILE%.gitconfig` (on Windows). Local settings reside in `.git/config` within each repository. Examining these files directly can offer deeper insight into your Git setup.
You can open these files with a text editor to view or even manually edit the settings. However, using the `git config` command is generally safer and recommended. It handles formatting and ensures consistency. For more detailed information, consult the official Git documentation: git-scm.com/docs/git-config.
Best Practices and Troubleshooting Git User Settings
Maintaining a consistent and accurate Git identity is a best practice for any developer. Following a few guidelines can prevent common issues and streamline your workflow. Even with careful setup, problems can sometimes arise. Knowing how to troubleshoot them is equally important for a smooth development experience.
Tips for Consistent Git Identity Management
Consistency is key to effective version control. Use the same username and email across all your personal projects and platforms like GitHub. This makes your contributions easily recognizable. Furthermore, regularly verify your settings, especially after setting up a new machine or cloning a new repository. This proactive approach saves time.
- Always use your full, professional name.
- Match your Git email to your GitHub/GitLab primary email.
- Periodically check your global and local configurations.
- Use local settings only when absolutely necessary for specific projects.
What to Do If Your Git Identity is Incorrect
If you discover your Git identity is wrong, simply re-run the `git config` commands with the correct information. For global changes, use `–global`. For local changes, navigate to the repository and omit `–global`. Note that this will only affect future commits. Existing commits retain their original author information.
Correcting past commits’ author information is possible but more complex. It usually involves rewriting Git history, which can be disruptive in shared repositories. Therefore, it’s best to avoid this situation by verifying your settings upfront. Prevention is always better than a cure in Git.
authentication-and-commit-attribution-problems">Resolving Authentication and Commit Attribution Problems
Sometimes, your commits might not link to your profile on GitHub or GitLab, even after setting your username and email. This often happens if the email address in your Git configuration doesn’t match a verified email on your platform account. Ensure your Git email is added and verified on your remote hosting service.
Additionally, some platforms like GitHub offer a “noreply” email address for privacy. If you use this, ensure it’s correctly configured in Git. Authentication issues, however, are usually related to SSH keys or personal access tokens, not directly to your `user.name` or `user.email` settings. Address these separately if they arise.
Frequently Asked Questions
Can I change my Git username and email after committing?
Yes, you can change your Git username and email at any time using the `git config` commands. However, these changes only apply to future commits. Past commits will retain the author information they were created with. Modifying the author of existing commits requires rewriting history, which is generally discouraged in shared repositories.
What happens if I don’t set my Git identity?
If you don’t set your Git username and email, Git will often try to guess them from your system’s user information. If it cannot, your commits will be made with generic or placeholder values, such as “unknown” or “your_username@your_hostname.” This leads to incorrect attribution and potential issues with collaboration platforms.
How do I remove a Git username or email setting?
To remove a Git username or email setting, you can use the `git config –unset` command. For example, to remove a global email, you would type: `git config –global –unset user.email`. This will remove the entry from your configuration file. Git will then fall back to a higher-level setting or prompt for the information.
Why is my Git email showing as “noreply.github.com”?
This typically occurs if you have enabled the “Keep my email address private” setting on GitHub. GitHub then provides a unique “noreply” email address to use in your Git configuration. If you set this email in Git, your commits will show this address instead of your primary email, protecting your privacy.
Conclusion: Master Your Git Identity for Seamless Workflow
Properly configuring how to set Git username and email is a foundational skill for any developer. It ensures accurate attribution, fosters clear collaboration, and prevents common headaches in version control. By understanding global and local settings, verifying your configuration, and following best practices, you can maintain a professional and efficient Git workflow. Take control of your Git identity today to ensure your contributions are always recognized correctly. Share this guide with your team to promote consistent Git practices!