Understanding how to manage user accounts is fundamental for any Linux administrator or power user. This guide will walk you through how to create users in Linux (useradd command), a crucial skill for system security and organization. We will explore the `useradd` command, its syntax, and various options to effectively manage access on your Linux system. By the end, you will confidently add new users, assign them to groups, and set up their environments.
Understanding the `useradd` Command: Syntax and Defaults
The `useradd` command is a powerful utility designed to create new user accounts on a Linux system. It automatically performs several actions, including creating a new home directory and updating system configuration files. Learning how to create users in Linux using this command is a core aspect of system administration. Furthermore, it ensures proper permissions and access control for all users.
Basic-useradd-command-structure-and-options">Basic `useradd` Command Structure and Options
The most basic way to create a user is simply by providing a username. However, `useradd` offers numerous options to customize the new user’s environment. These options allow administrators to specify details like the home directory, default shell, and user ID. Therefore, understanding these flags is essential for tailored user provisioning.
-m: Creates the user’s home directory if it doesn’t exist.-s <SHELL>: Specifies the user’s default login shell (e.g.,/bin/bash).-u <UID>: Sets the User ID (UID) for the new user.-g <GROUP>: Assigns the user to a primary group by name or GID.-G <GROUPS>: Adds the user to additional supplementary groups.-c <COMMENT>: Provides a descriptive comment for the user account.
Default Behavior When Creating New Linux Users
When you use `useradd` without specific options, it relies on system-wide defaults. These defaults are typically defined in configuration files like `/etc/default/useradd` and `/etc/login.defs`. Consequently, a home directory is usually created, and a default shell is assigned. It’s important to be aware of these defaults to avoid unexpected configurations.
Key Configuration Files Influencing User Creation
Several critical files dictate how `useradd` behaves and where user information is stored. These files are central to user management on any Linux distribution. Knowing their purpose helps in troubleshooting and advanced configuration. For example, `/etc/passwd` stores user account information, while `/etc/shadow` handles encrypted passwords.
/etc/passwd: Contains user account information (username, UID, GID, home directory, shell)./etc/shadow: Stores encrypted user passwords and password expiration information./etc/group: Defines user groups and their members./etc/gshadow: Stores encrypted group passwords./etc/default/useradd: Specifies default values for `useradd` options.
Step-by-Step Guide: How to Create Users in Linux with `useradd`
Creating a new user account involves a few straightforward steps using the `useradd` command. This section provides a practical, step-by-step guide to help you master how to create users in Linux. Remember, these operations often require root privileges, so you will need to use `sudo`.
Creating a Basic User Account Using `useradd`
To create a simple user, you only need to provide the username. The system will then apply its default settings for the home directory and shell. For instance, `sudo useradd newuser` will create an account named ‘newuser’. Always ensure you have administrative rights before executing this command.
- Open your terminal: Access your command-line interface.
- Use `sudo` with `useradd`: Type `sudo useradd [username]`. For example, `sudo useradd john_doe`.
- Verify creation (optional): You can check `/etc/passwd` for the new entry or look for the home directory.
Setting a Password for the Newly Created Linux User
After creating a user, setting a password is the next crucial step for security. Without a password, the new user cannot log in. The `passwd` command is specifically designed for this purpose. Therefore, it’s an indispensable tool in your user management toolkit.
To set a password, execute the `passwd` command followed by the username. The system will then prompt you to enter and confirm the new password. For example, `sudo passwd john_doe` will allow you to set a password for the ‘john_doe’ account. Always choose a strong, unique password.

Verifying User Creation and Home Directory
Confirming that the user and their associated resources were created correctly is a good practice. This verification step ensures everything is in order before the user attempts to log in. You can check the `/etc/passwd` file or inspect the home directory manually. Furthermore, checking group memberships is also beneficial.
You can use commands like `id [username]` to display user and group information. Additionally, checking the `/home` directory for the newly created user’s folder confirms the home directory creation. This simple verification helps prevent common login issues.
Advanced `useradd` Options for Customizing Linux Users
Beyond basic creation, `useradd` offers extensive options for fine-tuning user accounts. These advanced settings allow for precise control over user environments and permissions. Mastering these options is key to robust Linux user management. They empower administrators to meet specific organizational requirements.
Specifying Home Directory, Shell, and User ID (UID)
You might need to place a user’s home directory in a non-standard location or assign a specific shell. The `useradd` command provides flags for these customizations. For example, `sudo useradd -m -d /opt/users/devuser -s /bin/zsh -u 1005 devuser` creates a user with a custom home, shell, and UID. This flexibility is vital for specialized user roles.
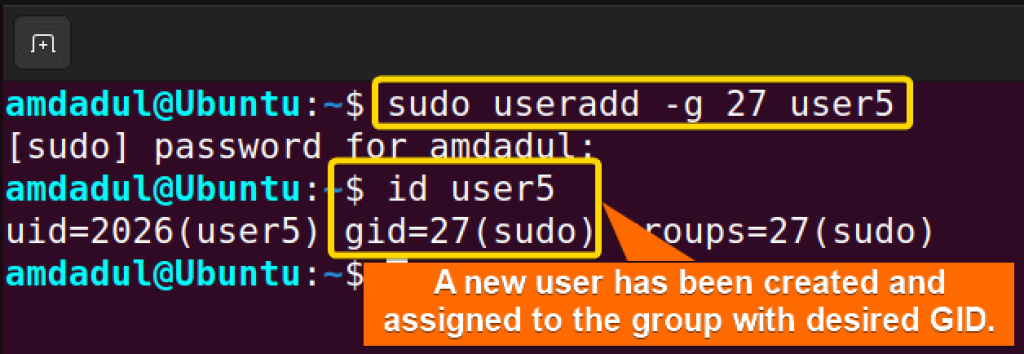
Assigning Users to Primary and Secondary Groups
Group management is critical for controlling file and directory access. Every user has a primary group, and they can belong to multiple secondary groups. Using the `-g` and `-G` options with `useradd` allows you to define these memberships during creation. This ensures users have appropriate permissions from the outset. For example, `sudo useradd -g developers -G testers,qa newdeveloper` assigns ‘newdeveloper’ to the ‘developers’ primary group and ‘testers’ and ‘qa’ secondary groups.
Setting Account Expiration Dates and Comments
For temporary accounts or enhanced security, you can set an account expiration date. The `-e` option in `useradd` accepts a date in YYYY-MM-DD format. Additionally, the `-c` option allows you to add a descriptive comment, useful for identifying the user’s purpose. These features are invaluable for managing temporary access or auditing user accounts.
For example, `sudo useradd -e 2024-12-31 -c “Temporary contractor account” contract_user` creates a user that will expire at the end of the year. This proactive approach enhances security by automatically disabling accounts when no longer needed. It is an important part of knowing how to create users in Linux effectively.
Managing and Modifying Linux User Accounts Post-Creation
Creating users is just one part of user account lifecycle management. You will often need to modify existing users, delete old ones, or list all accounts. These tasks are accomplished using related commands that complement `useradd`. Therefore, understanding these tools is essential for comprehensive user administration.
Modifying User Properties with the `usermod` Command
The `usermod` command allows you to change a user’s properties after their creation. You can modify their home directory, shell, groups, or even username. For instance, `sudo usermod -s /bin/ksh username` changes the user’s shell to ksh. This flexibility ensures accounts remain up-to-date with changing requirements.
Deleting User Accounts with `userdel`
When a user no longer needs access, `userdel` is used to remove their account. Using the `-r` option will also remove their home directory and mail spool. For example, `sudo userdel -r olduser` completely removes the ‘olduser’ account and its associated files. Always exercise caution when deleting user accounts to avoid accidental data loss.
Listing All Users on Your Linux System
To get an overview of all existing user accounts, you can inspect the `/etc/passwd` file. This file lists all users, their UIDs, GIDs, and home directories. Alternatively, commands like `getent passwd` provide a more structured output. Knowing how to list users is crucial for auditing and managing your system effectively.
You can also use `cat /etc/passwd | cut -d: -f1` to quickly list only the usernames. This simple command provides a clear list of all accounts. Regularly reviewing this list helps identify dormant or unauthorized accounts, improving system security.
Troubleshooting Common `useradd` Command Issues
Even with careful execution, you might encounter issues when trying to create users in Linux. Knowing how to troubleshoot these common problems can save significant time and frustration. This section addresses frequent errors and provides solutions.
Resolving ‘useradd: user already exists’ Errors
This error occurs when you try to create a user with a username that is already in use. The solution is straightforward: choose a different, unique username. You can verify existing users by checking `/etc/passwd` or using `id [username]` to see if the name is taken. Always double-check before attempting to create a new account.
Addressing Permissions and Privilege-Related Problems
The `useradd` command requires root privileges to execute. If you encounter “Permission denied” errors, it means you are not running the command as root or with `sudo`. Always prefix `useradd` commands with `sudo` to ensure proper authorization. Incorrect permissions can prevent the command from modifying system files.
Best Practices for Secure User Creation in Linux
Security should always be a top priority when creating new user accounts. Here are some best practices:
- Use strong passwords: Enforce complex passwords and regular changes.
- Principle of Least Privilege: Grant only necessary permissions to users.
- Assign to appropriate groups: Control access via group memberships, not individual permissions.
- Set account expiration: For temporary users, specify an expiration date.
- Regularly audit accounts: Review user lists and permissions periodically.
Following these guidelines helps maintain a secure and well-managed Linux environment. It is paramount for anyone learning how to create users in Linux.
Frequently Asked Questions (FAQs) about Creating Linux Users
How do I create a user without a home directory using `useradd`?
To create a user without a home directory, use the `-M` option with the `useradd` command. For example, `sudo useradd -M nohomediruser`. This is often useful for service accounts that do not require interactive login or personal files.
adduser">What is the difference between `useradd` and `adduser`?
`useradd` is the low-level utility for adding users, while `adduser` is a higher-level script that often wraps `useradd`. `adduser` is more user-friendly, interactive, and automatically handles common tasks like creating a home directory and prompting for a password. It is typically preferred on Debian-based systems.
Can I create multiple users at once with the `useradd` command?
The `useradd` command itself does not support creating multiple users in a single command execution. However, you can achieve this by scripting a loop or using tools like `newusers` which takes a file of user definitions as input. This approach is efficient for bulk user creation.
How do I check a user’s groups in Linux after creation?
You can check a user’s group memberships using the `groups` command followed by the username (e.g., `groups john_doe`). Alternatively, the `id` command provides more detailed information, including UID, GID, and all group memberships (e.g., `id john_doe`).
What happens if I don’t specify a shell for a new user?
If you do not specify a shell using the `-s` option, `useradd` will assign the default shell defined in `/etc/default/useradd` or `/etc/login.defs`. This is commonly `/bin/bash` or `/bin/sh`. You can verify the default shell by checking these configuration files. For more information on Linux commands, you can refer to Wikipedia’s List of Linux Commands.
Conclusion: Mastering User Creation in Linux with `useradd`
Effectively managing user accounts is a cornerstone of Linux system administration. You have now learned how to create users in Linux (useradd command), along with its essential options and best practices. From basic user creation to advanced customizations like group assignments and account expiration, the `useradd` command provides robust control. Furthermore, understanding related commands like `passwd`, `usermod`, and `userdel` completes your user management toolkit.
By applying the knowledge gained, you can confidently provision and manage user access, ensuring a secure and organized Linux environment. Continue practicing these commands to solidify your understanding. What are your biggest challenges when managing users in Linux? Share your thoughts and questions in the comments below!