Navigating vast file systems to locate specific text can be a daunting task for developers and system administrators alike. Fortunately, the powerful `grep` utility offers an elegant solution. Learning to grep search string in files recursive is a fundamental skill that significantly enhances command-line efficiency. This guide will walk you through the essential commands and techniques to master recursive searches, ensuring you can find any string across multiple directories with ease.
Introduction: Mastering Recursive Grep Search
Grep, an acronym for “Global Regular Expression Print,” is a command-line utility for searching plain-text data sets for lines that match a regular expression. It is an indispensable tool in Unix-like operating systems. Understanding its capabilities, especially recursive searching, can save immense time and effort when dealing with large codebases or complex configurations.
What is Grep and Why is it Essential for File Search?
Grep allows users to quickly find patterns within files. It scans files line by line, printing any lines that contain a match for the specified pattern. Its speed and flexibility make it a cornerstone for tasks like debugging code, analyzing log files, or simply locating specific information within documents. Therefore, mastering grep is crucial for anyone working with the command line.
The Power of Recursive Searching Explained
Recursive searching extends grep’s functionality beyond a single directory. It enables the utility to descend into subdirectories, searching files within them too. This is incredibly powerful when you need to find a string without knowing its exact file path or if it might reside in many different locations. Consequently, recursive grep is a must-have technique.
Setting Up Your Environment for Grep
Grep is typically pre-installed on most Linux and macOS systems. You can verify its presence by typing `grep –version` in your terminal. If it’s not available, you might need to install it via your system’s package manager (e.g., `sudo apt-get install grep` on Debian/Ubuntu or `brew install grep` on macOS). Furthermore, ensuring your terminal is comfortable for long sessions is also beneficial.
Understanding the Core: How to Grep Search String in Files Recursive
The primary way to initiate a grep search string in files recursive is by using specific command-line options. These options tell `grep` to look beyond the current directory and explore its subdirectories. This functionality is central to efficient file system navigation and data retrieval.
Basic-grep-r-and-grep-r-commands">The Basic `grep -r` and `grep -R` Commands
To perform a recursive search, you primarily use the `-r` or `-R` option. Both instruct `grep` to search directories recursively. The `-r` option is standard, while `-R` (often called `–dereference-recursive`) also follows symbolic links, which can be important in certain file structures. Therefore, choosing the right option depends on your specific needs.
For example, to search for “my_function” recursively starting from the current directory, you would type:
grep -r "my_function" .Here, the `.` signifies the current directory. However, you can specify any starting directory path. This simple command initiates a powerful recursive search.
Syntax and Common Use Cases for Recursive Grep
The general syntax for a recursive grep command is `grep [options] “pattern” [directory]`. The “pattern” can be a simple string or a complex regular expression. Common use cases include finding all occurrences of a variable name in a project, locating configuration settings, or searching for specific error messages across log files. Moreover, this flexibility makes it invaluable.
- Finding code snippets: Quickly locate where a function or variable is defined or used.
- Debugging: Search for error messages or specific log entries across multiple log files.
- Configuration management: Identify specific settings within a directory of configuration files.
Interpreting Grep’s Output for Recursive Searches
When `grep` finds a match in a recursive search, its output typically includes the filename, followed by a colon, and then the line containing the match. For instance, `src/utils.py: return my_function(data)`. This format helps you quickly identify the file and the exact line where the string was found. Furthermore, understanding this output is key to effective use.
Refining Your Recursive Grep Searches
While basic recursive searches are powerful, `grep` offers numerous options to refine your search criteria. These options allow you to tailor your search, making it more precise and efficient. Consequently, you can quickly narrow down results to exactly what you need.
Performing Case-Insensitive Recursive Grep (`-i`)
Often, you might need to find a string regardless of its capitalization. The `-i` option makes `grep` perform a case-insensitive search. For example, `grep -ri “error”` will match “error”, “Error”, “ERROR”, and so on. This is particularly useful when you’re unsure of the exact casing used in the files.
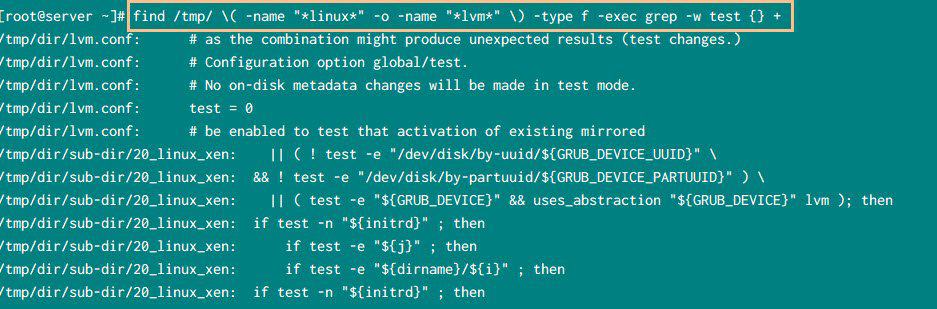
Searching for Whole Words Recursively (`-w`)
Sometimes, you want to match only whole words, not substrings. The `-w` option ensures that `grep` matches only the specified pattern when it forms a complete word. For instance, `grep -rw “run”` will find “run” but not “running” or “rerun”. This precision is vital for accurate search results.
Inverting Matches: Finding Lines Without the String (`-v`)
Conversely, you might want to find lines that do not contain a specific string. The `-v` option inverts the match, printing lines that do not match the pattern. This is excellent for filtering out irrelevant information, such as log lines without errors. Therefore, it helps focus on what’s missing.
Targeting Files: Grep Recursive Search with Include/Exclude
When performing a grep search string in files recursive, you often need to limit the search to specific file types or exclude certain directories. `Grep` provides powerful options to achieve this, significantly improving search performance and relevance. These filters are essential for large projects.
Including Specific File Types (`–include`)
The `–include` option allows you to specify a glob pattern for filenames to include in the search. This is incredibly useful for searching only source code files, for example. You can specify multiple `–include` patterns to search for various file types.
Here’s how to search for “my_variable” only in `.js` and `.ts` files recursively:
- `grep -r “my_variable” –include=”*.js” .`
- `grep -r “my_variable” –include=”*.ts” .`
- `grep -r “my_variable” –include=”*.{js,ts}” .` (for multiple patterns)
This method ensures your search is highly targeted, avoiding unnecessary scans of irrelevant files. Consequently, it saves time and resources.
Excluding Directories and Files (`–exclude`, `–exclude-dir`)
Just as you can include files, you can also exclude them. The `–exclude` option excludes files matching a pattern, while `–exclude-dir` excludes entire directories. This is crucial for ignoring build directories, version control folders (like `.git`), or temporary files. Furthermore, it keeps your search results clean.
For example, to exclude the `node_modules` directory and `.log` files:
grep -r "pattern" --exclude-dir="node_modules" --exclude="*.log" .This command prevents `grep` from wasting time searching through large, often irrelevant, directories. It significantly optimizes the search process.
Combining Include and Exclude Patterns for Precise Grep Search
The real power comes from combining these options. You can create highly specific search queries by using `–include` and `–exclude` (or `–exclude-dir`) together. This allows you to define exactly where `grep` should and should not look. Therefore, your searches become incredibly efficient and focused.
Advanced Grep Techniques for Recursive File Search
Beyond the fundamental options, `grep` offers advanced features that provide even greater control over your recursive searches and their output. These techniques are particularly useful for complex analysis and debugging tasks. Mastering them elevates your command-line proficiency.
Displaying Context Around Matches (`-A`, `-B`, `-C`)
Sometimes, seeing only the matching line isn’t enough; you need context. The `-A N` option displays `N` lines after the match, `-B N` displays `N` lines before the match, and `-C N` displays `N` lines around the match (both before and after). This is invaluable for understanding the code or log context of a match.
Searching for Multiple Patterns Recursively (`-e`, `egrep`)
To search for multiple distinct patterns simultaneously, you can use the `-e` option multiple times, or simply use `egrep` (which is equivalent to `grep -E`). `egrep` treats patterns as extended regular expressions, allowing for more complex pattern matching, including the `|` (OR) operator. This is highly efficient for finding any of several keywords.
For example, to find either “error” or “warning” recursively:
grep -r -e "error" -e "warning" .Or using `egrep`:
egrep -r "error|warning" .These commands streamline the process of finding multiple related items. You gain significant time savings.
Formatting Grep Output for Better Readability
Grep offers options to customize its output for better readability. For instance, `–color=auto` highlights matches, making them easier to spot. The `-n` option displays line numbers, and `-H` always shows filenames, even for single files. These small adjustments can greatly enhance your ability to quickly parse results.
Performance Tips and Alternatives for Recursive Grep
While `grep` is incredibly powerful, certain scenarios might benefit from optimization or alternative tools. Understanding these options helps you choose the best approach for any given task. Efficiency is paramount when dealing with vast data sets.
Optimizing Grep for Large File Systems and Deep Recursion
For very large file systems or deep directory structures, `grep` can be slow. Using `–exclude-dir` and `–include` extensively is the best way to optimize. Additionally, consider piping `find` command output to `grep` for more control over which files are processed. This combination offers superior filtering capabilities.
Using `find` with `grep` for Enhanced Control
The `find` command is excellent for locating files based on various criteria (name, type, modification date). You can combine `find` with `grep` using `xargs` or `-exec` to perform highly specific recursive searches. This provides granular control that `grep` alone cannot offer.
For example, to search for “my_string” only in `.txt` files modified in the last 7 days:
find . -name "*.txt" -mtime -7 -print0 | xargs -0 grep "my_string"This powerful combination allows for extremely precise searches, targeting only relevant files. It is a common pattern for advanced users.
When to Consider `ack`, `ripgrep`, or `the_silver_searcher`
For truly massive codebases, specialized tools like `ack`, `ripgrep` (often shortened to `rg`), and `the_silver_searcher` (`ag`) offer faster performance and more developer-friendly features than `grep`. They are optimized for code searching and often ignore version control directories by default. These tools are excellent alternatives for modern development workflows. You can learn more about `grep` and its history on Wikipedia.
Frequently Asked Questions About Grep Recursive Search
How do I `grep` for multiple strings recursively?
You can `grep` for multiple strings recursively using the `-e` option for each pattern, like `grep -r -e “pattern1” -e “pattern2” .`. Alternatively, you can use `egrep` (or `grep -E`) with patterns separated by the `|` (OR) operator, such as `egrep -r “pattern1|pattern2” .`.
What’s the difference between `grep -r` and `grep -R`?
Both `grep -r` and `grep -R` perform recursive searches. The key difference is that `grep -R` (or `–dereference-recursive`) will follow symbolic links encountered during the recursion, whereas `grep -r` typically does not. Use `-R` if you need to search content pointed to by symlinks.
Can I `grep` recursively and ignore binary files?
Yes, `grep` automatically tries to skip binary files by default when it detects them. If you want to explicitly ensure binary files are ignored, you can use the `-I` (capital i) option. This prevents `grep` from printing “Binary file matches” messages and focuses on text content.
Conclusion: Efficiently Grep Search String in Files Recursive
Mastering the ability to grep search string in files recursive is an indispensable skill for anyone working with command-line interfaces and file systems. From basic recursive commands to advanced filtering and context options, `grep` provides a robust toolkit for efficient text searching. By applying the techniques discussed, you can significantly enhance your productivity and streamline your workflow.
Recap of Key Recursive Grep Commands and Best Practices
Remember to use `-r` or `-R` for recursion, `-i` for case-insensitivity, and `-w` for whole-word matches. Leverage `–include` and `–exclude-dir` for precise targeting. These practices ensure your searches are both fast and accurate. Furthermore, always consider the context of your search.
Empowering Your Command-Line Workflow with Recursive Grep
The power of recursive `grep` extends beyond simple text finding; it empowers you to quickly diagnose issues, locate specific code, and manage configurations across complex projects. Integrating these commands into your daily routine will undoubtedly make you a more efficient user. Therefore, practice these commands regularly.
Further Learning and Resources for Grep Mastery (CTA)
To further deepen your `grep` knowledge, explore its full range of regular expression capabilities and other advanced options in its man page (`man grep`). Experiment with different combinations of flags to see their effects. What are your favorite `grep` tricks? Share them in the comments below, or explore our other guides on command-line tools to continue your learning journey!