Navigating the Linux command line involves mastering various utilities, especially for file management. Understanding How to Use the gunzip Command in Linux is fundamental for anyone working with compressed files. This powerful command allows you to decompress files that have been compressed using the gzip utility. It is an essential tool for system administrators, developers, and everyday Linux users alike. Therefore, learning its proper application significantly enhances your command-line proficiency and efficiency.
What is the gunzip Command and Why is it Essential?
The gunzip command serves as the primary utility for decompressing files compressed with gzip. Gzip is a widely used compression algorithm in Linux and Unix-like systems. Furthermore, it efficiently reduces file sizes, saving disk space and speeding up data transfer. Consequently, gunzip becomes indispensable for accessing the original content of these compressed archives.
The Role of Gzip Compression in Linux Systems
Gzip compression plays a critical role in optimizing storage and network performance. Many system logs, software packages, and backup files are often stored in a `.gz` format. This standard practice ensures that resources are utilized effectively. Therefore, knowing how to decompress these files is a core skill for managing a Linux environment.
Key Benefits of Using gunzip for File Management
Using gunzip offers several distinct advantages for managing your files. It simplifies the process of accessing compressed data. Additionally, it ensures compatibility with a vast array of Linux tools and scripts. Here are some key benefits:
- Space Efficiency: Access original files from space-saving compressed archives.
- Data Integrity: gunzip can verify the integrity of compressed files during decompression.
- System Compatibility: It is a standard utility found on virtually all Linux distributions.
- Ease of Use: The command is straightforward, even for beginners.
Brief History and Purpose of the gunzip Utility
The gzip and gunzip utilities were developed as free software replacements for the compress program. They quickly became the de facto standard for single-file compression in the Unix world. Their primary purpose remains consistent: to provide a simple, effective method for reducing file sizes. Moreover, they ensure that the original data can be reliably restored whenever needed.
Basic-syntax-how-to-use-the-gunzip-command-in-linux">Basic Syntax: How to Use the gunzip Command in Linux
The fundamental syntax for gunzip is quite simple. You typically provide the command followed by the name of the compressed file. This straightforward approach makes it accessible for new users. However, understanding its options allows for more versatile usage. Let’s explore the basic steps.
Decompressing a Single .gz File: A Step-by-Step Guide
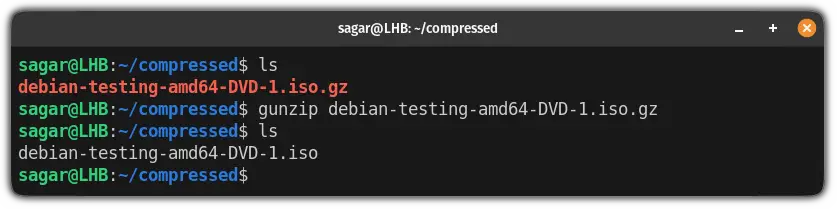
To decompress a single `.gz` file, you only need to specify its filename. This action will extract the original file and remove the compressed version. Here is a numbered guide to help you:
- Open your terminal application.
- Navigate to the directory containing your `.gz` file using the `cd` command.
- Type `gunzip filename.gz` and press Enter.
- The original file (`filename`) will appear in the directory, and `filename.gz` will be gone.
Understanding Default Behavior: Original File Deletion
By default, gunzip replaces the compressed file with its decompressed version. This behavior is often desirable for saving disk space. However, it is important to be aware of this action. Always ensure you have backups or understand the implications before running gunzip on critical files. This prevents accidental data loss.
Keeping the Original Compressed File with gunzip
Sometimes, you might want to retain the original `.gz` file after decompression. You can achieve this using the `-k` (keep) option. This is particularly useful when you need both the compressed and uncompressed versions. For example, `gunzip -k myfile.txt.gz` will create `myfile.txt` while keeping `myfile.txt.gz` intact.
Common gunzip Options and Flags for Efficient Decompression
The gunzip command offers several options to customize its behavior. These flags provide greater control over the decompression process. Learning these options can significantly enhance your efficiency. They allow you to handle various scenarios with ease.
Viewing File Contents Without Decompression (-c)
The `-c` (stdout) option allows you to decompress a file and send its output to standard output. This means the decompressed content is displayed on your terminal. It is very useful for quickly inspecting a file’s content without actually creating the uncompressed file. For instance, `gunzip -c logfile.gz | less` lets you view large log files.
Forcing Decompression of Existing Files (-f)
If a decompressed file with the same name already exists, gunzip will typically prompt you before overwriting it. The `-f` (force) option bypasses this prompt. It forces gunzip to overwrite any existing files without asking for confirmation. Use this option with caution, as it can lead to unintended data loss. Always double-check your commands.
Recursive Decompression of Directories (-r)
When you have multiple compressed files spread across several subdirectories, the `-r` (recursive) option comes in handy. This option tells gunzip to traverse through directories and decompress all `.gz` files it finds. It streamlines the process of handling large, organized archives. For example, `gunzip -r my_archive_folder` will decompress all relevant files within that folder.
Working with Multiple Files and Directories Using gunzip
The gunzip command is not limited to single-file operations. You can efficiently manage multiple compressed files and entire directories. This capability is crucial for bulk operations and managing complex data structures. Understanding these techniques saves considerable time and effort.
Decompressing Several .gz Files Simultaneously
You can decompress multiple `.gz` files in one go by listing them after the gunzip command. Simply separate each filename with a space. For example, `gunzip file1.gz file2.gz file3.gz` will decompress all three files. This method is straightforward for a small number of files.
Using Wildcards to Decompress All .gz Files in a Directory
For decompressing all `.gz` files within a specific directory, wildcards are incredibly powerful. The asterisk (``) acts as a placeholder for any sequence of characters. Running `gunzip .gz` in a directory will decompress every file ending with `.gz`. This is a common and highly efficient way to handle bulk decompression tasks.

Handling Nested Compressed Files with gunzip
Sometimes, you might encounter archives within archives. While gunzip primarily handles `.gz` files, you might need to combine it with other tools for nested archives. For instance, a `.tar.gz` file contains a `.tar` archive, which itself holds multiple files. We will discuss this specific scenario in the next section. However, for simple nested `.gz` files, recursive options can help.
Integrating gunzip with Tar Archives: Decompressing .tar.gz Files
Many Linux users frequently encounter `.tar.gz` files, often called “tarballs.” These are archives created by combining the `tar` (tape archive) utility with gzip compression. Understanding How to Use the gunzip Command in Linux with these files is crucial. It requires a slightly different approach than simple `.gz` files.
Understanding the Structure of .tar.gz (Tarball) Files
A `.tar.gz` file is essentially two layers of archiving. First, `tar` bundles multiple files and directories into a single `.tar` archive. Then, `gzip` compresses this `.tar` archive into a `.tar.gz` file. Therefore, decompressing a tarball involves both decompression and extraction steps. It is a very common packaging format.
Using tar -xzf for Combined Decompression and Extraction
The most common and recommended way to decompress and extract a `.tar.gz` file is using the `tar` command itself. The `-x` option extracts, `-z` tells tar to use gzip for decompression, and `-f` specifies the archive file. For example, `tar -xzf archive.tar.gz` will decompress and extract all contents in one command. This is highly efficient and widely used.
Manually Decompressing .tar.gz with gunzip and tar
While `tar -xzf` is convenient, you can also perform the steps manually. First, use gunzip to decompress the `.tar.gz` file into a `.tar` file: `gunzip archive.tar.gz`. This will leave you with `archive.tar`. Next, extract the contents of the `.tar` file using `tar -xf archive.tar`. This two-step process demonstrates the separate roles of gunzip and tar.
Troubleshooting and Advanced Tips for Using the gunzip Command
Even with a straightforward command like gunzip, issues can arise. Knowing how to troubleshoot common problems is invaluable. Furthermore, some advanced techniques can significantly streamline your workflow. These tips will help you become a more proficient user.
Dealing with ‘Not in gzip format’ Errors
This error message indicates that the file you are trying to decompress is not a valid gzip archive. It might be a different compression format (like `.zip` or `.bzip2`) or a corrupted file. Always verify the file extension and type. You can use the `file` command (e.g., `file myfile.gz`) to inspect its actual format. This helps diagnose the issue.
Checking Compressed File Integrity with gunzip -t
Before decompressing a critical file, you might want to verify its integrity. The `-t` (test) option allows gunzip to check the compressed file for errors without actually decompressing it. For example, `gunzip -t important_data.gz` will report if the file is corrupted. This is an excellent preventative measure against data loss. Learn more about gzip and gunzip on its Wikipedia page.
Using gunzip with Pipes and Other Linux Commands
One of Linux’s strengths is piping the output of one command as input to another. You can use `gunzip -c` with pipes to process compressed data on the fly. For example, `cat access.log.gz | gunzip -c | grep “error”` will decompress a log file and search for “error” messages without creating an uncompressed file. This technique is extremely powerful for scripting and analysis.
Frequently Asked Questions
What is the difference between gzip and gunzip?
Gzip is the command used to compress files, typically adding a `.gz` extension. Conversely, gunzip is the command specifically designed to decompress files that were compressed using gzip. They are complementary utilities, with gzip creating the compressed archive and gunzip restoring the original file.
Can gunzip decompress .zip or .rar files?
No, gunzip is specifically for `.gz` files. It cannot decompress files compressed with other utilities like `.zip` (which uses `unzip`) or `.rar` (which uses `unrar`). Each compression format requires its specific decompression tool. Therefore, you must use the correct command for the file type.
How do I decompress a file to a different directory?
Gunzip does not have a direct option to specify an output directory. However, you can achieve this by changing to the target directory first and then running gunzip with the full path to the compressed file. Alternatively, you can decompress the file in its original location and then move it using the `mv` command: `gunzip file.gz; mv file /path/to/new/directory`.
Conclusion: Mastering File Decompression with the gunzip Command
Understanding How to Use the gunzip Command in Linux is a fundamental skill for efficient file management. From basic decompression to advanced usage with pipes and tarballs, gunzip proves its versatility. It is an indispensable tool for anyone navigating the Linux command line. By applying the techniques and tips discussed, you can confidently handle compressed files. Continue exploring other Linux commands to further enhance your system administration capabilities. Share your favorite gunzip tips in the comments below!