The Tar Command in Linux (Create and Extract Archives) is an indispensable utility for managing files and directories. It allows users to consolidate multiple files into a single archive file, often referred to as a “tarball.” This powerful command is crucial for tasks like backups, software distribution, and transferring large sets of data efficiently. Understanding its functionality is a fundamental skill for any Linux user or system administrator.
Understanding the Tar Command in Linux (Create and Extract Archives)
The Tar command, short for Tape Archive, originated in the early days of Unix for writing data to sequential I/O devices like tape drives. Today, its primary role is to bundle files and directories into a single archive. This archiving process simplifies file management significantly. Furthermore, it prepares data for optional compression, making transfers faster and storage more economical.
What is Tar and Why is it Essential for Linux Users?
Tar is a command-line tool used to create, extract, and manage archive files. It does not inherently compress files; rather, it aggregates them. Linux users find it essential for several reasons. It helps in creating system backups, packaging software for distribution, and moving entire directory structures. Therefore, mastering tar improves productivity and system administration capabilities.
Brief History and Core Purpose of Tar Archiving
Developed in 1979, Tar was initially designed for backing up files to magnetic tape. Over time, its utility expanded beyond tape drives to encompass disk-based archiving. Its core purpose remains consistent: to combine multiple files and directories into one cohesive archive. This single file then becomes easier to manage, copy, or compress.
Key Benefits of Using Tar for File Management
Using the Tar command offers numerous advantages for file management. Firstly, it simplifies the handling of many files by consolidating them. Secondly, it preserves file permissions, ownerships, and directory structures during archiving. Lastly, it integrates seamlessly with various compression utilities, allowing for efficient storage and transfer. These benefits make tar an invaluable tool.
- Simplified File Handling: Consolidate hundreds of files into one.
- Metadata Preservation: Maintain original file attributes.
- Compression Integration: Easily combine with gzip, bzip2, xz for smaller archives.
- Cross-Platform Compatibility: Tar archives are widely supported across Unix-like systems.
Getting Started with the Tar Command in Linux
Before you begin creating or extracting archives, it’s important to understand the Basic syntax and common options of the Tar command. This foundation will allow you to perform most archiving tasks effectively. The command is highly flexible, offering many flags to control its behavior. Therefore, familiarity with these basics is key.
Common Tar Command Options and Their Functions
The Tar command uses various options to define its actions. Each option typically starts with a hyphen. For instance, -c creates an archive, while -x extracts files. Understanding these core options is crucial for effective use. Additionally, combining options allows for complex operations, such as creating a compressed archive.
-c(create): Creates a new archive.-x(extract): Extracts files from an archive.-v(verbose): Displays progress and lists files being processed.-f(file): Specifies the archive file name. Always used with-cor-x.-z(gzip): Compresses or decompresses the archive using gzip.-j(bzip2): Compresses or decompresses the archive using bzip2.-J(xz): Compresses or decompresses the archive using xz.
General Tar Syntax: tar [options] [archive-file] [files/directories]
The basic syntax for the Tar command is straightforward. You start with tar, followed by the desired options, then the name of the archive file you want to create or interact with. Finally, you specify the files or directories to be included or extracted. For example, to create an archive, you might use tar -cvf myarchive.tar mydirectory/. This structure is consistent across most operations.
Prerequisites: Verifying Tar Installation and Basic Permissions
Most Linux distributions come with Tar pre-installed. You can verify its presence by typing tar --version in your terminal. Furthermore, ensure you have appropriate read/write permissions for the directories and files you intend to archive or extract. Lack of permissions can lead to errors. Therefore, checking these prerequisites saves time and prevents frustration.

Creating Tar Archives in Linux
Creating archives is a primary function of the Tar Command in Linux (Create and Extract Archives). This process involves bundling specified files or directories into a single .tar file. You can create simple archives or combine them with compression utilities for smaller file sizes. This section will guide you through the necessary steps.
Archiving Multiple Files and Directories with Tar
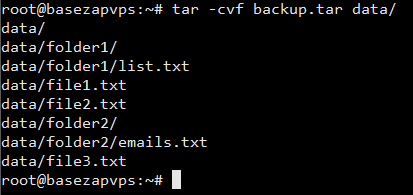
To create a basic tar archive, use the -c (create) and -f (file) options. The -v (verbose) option is also helpful to see the files being added. For example, tar -cvf myfiles.tar file1.txt file2.txt mydirectory/ will create an archive named myfiles.tar containing the specified files and the entire directory. This command is fundamental for bundling data.
Creating Compressed Tar Archives (tar.gz, tar.bz2, tar.xz)
For smaller archive sizes, you can combine tar with compression tools. Use -z for gzip (.tar.gz or .tgz), -j for bzip2 (.tar.bz2 or .tbz), or -J for xz (.tar.xz). For instance, tar -czvf myarchive.tar.gz /path/to/data creates a gzipped tarball. These compressed archives are ideal for storage and network transfers.
Excluding Specific Files or Directories During Archiving
Sometimes you need to archive a directory but exclude certain files or subdirectories. The --exclude option handles this. For example, tar -cvf project.tar project_folder/ --exclude='project_folder/temp_files' will create an archive of project_folder but skip the temp_files subdirectory. You can use multiple --exclude options for more complex exclusions. This feature is particularly useful for backups.
Extracting Files from Tar Archives
Extracting content from a tar archive is just as important as creating one. The Tar Command in Linux (Create and Extract Archives) provides flexible options for extracting all files, specific files, or to a designated location. This functionality is crucial when you receive a tarball or need to restore data from a backup. Understanding these extraction methods is vital.
Extracting All Contents to the Current Directory
To extract all files from a tar archive to your current working directory, use the -x (extract) and -f (file) options. For example, tar -xvf myarchive.tar.gz will decompress (if applicable) and extract all contents. The -v option shows the files being extracted. This is the most common extraction scenario.
Extracting Tar Archives to a Specific Destination Path
Often, you’ll want to extract an archive’s contents to a directory other than your current one. The -C (capital C) option allows you to specify a destination path. For instance, tar -xvf myarchive.tar.gz -C /path/to/destination/ will extract everything into the specified directory. Ensure the destination directory exists and you have write permissions. This prevents clutter in your current directory.
Extracting Specific Files or Directories from a Tar Archive
You don’t always need to extract an entire archive. To extract only specific files or directories, simply list them after the archive file name. For example, tar -xvf myarchive.tar.gz file_to_extract.txt will extract only that single file. Similarly, tar -xvf myarchive.tar.gz mydirectory/ will extract just that directory. This saves time and disk space.
Advanced Tar Command Techniques and Examples
Beyond basic creation and extraction, the Tar command offers more advanced functionalities. These techniques enhance your ability to manage archives more effectively. Learning these methods allows for greater control and flexibility. Consequently, you can handle complex archiving tasks with confidence.
Listing Contents of a Tar Archive Without Extraction
Before extracting, it’s often useful to see what’s inside an archive. The -t (list) option allows you to view the contents without actually extracting them. For example, tar -tvf myarchive.tar.gz will list all files and directories within the archive, along with their permissions and ownerships. This helps verify the archive’s content before committing to extraction.
Appending and Updating Existing Tar Archives
The Tar command can also modify existing archives. Use the -u (update) option to add new files or update existing ones in an archive if they are newer than their archived counterparts. For example, tar -uvf myarchive.tar new_file.txt. Similarly, -r (append) adds files to an archive regardless of their modification time. However, these options generally do not work with compressed archives (e.g., .tar.gz).
Verifying the Integrity of Tar Archives
Ensuring the integrity of your archives is crucial, especially for backups. While tar itself doesn’t have a direct integrity check option like some other tools, you can often “test” an archive by listing its contents. If the listing completes without errors, it suggests the archive is largely intact. For compressed archives, successful decompression during listing also implies integrity. For robust verification, consider using checksum tools like md5sum or sha256sum on the archive file itself. You can learn more about file integrity on Wikipedia: File Integrity.
Practical Use Cases for the Tar Command in Linux
The Tar command is not just a theoretical tool; it has numerous practical applications in daily Linux operations. From system administration to developer workflows, its utility is widespread. Understanding these real-world scenarios helps solidify your grasp of the command. Therefore, let’s explore some common use cases.
Efficiently Backing Up Home Directories and System Files
One of the most common uses for the Tar command is creating backups. You can easily archive your entire home directory or critical system configuration files. For example, tar -czvf /mnt/backup/home_backup_$(date +%Y%m%d).tar.gz /home/username creates a timestamped backup. This ensures your important data is safe and easily restorable. Regular backups are a cornerstone of good system hygiene.
Packaging Software and Data for Transfer Between Servers
When moving applications, websites, or large datasets between servers, tar is invaluable. It allows you to bundle all necessary files and directories into a single, manageable archive. This simplifies the transfer process, often via scp or rsync. Once transferred, the archive can be easily extracted on the destination server, preserving the original directory structure.
Automating Archiving Tasks with Tar in Shell Scripts
For repetitive archiving tasks, integrating the Tar command into shell scripts is highly efficient. You can automate daily or weekly backups, clean up old log files by archiving them, or prepare data for analysis. Scripts can handle complex logic, including error checking and notification. This automation saves time and reduces the chance of human error.
Frequently Asked Questions
Here are some common questions users have about the Tar Command in Linux (Create and Extract Archives). These answers provide further clarity on its usage and distinctions from related tools. Understanding these nuances will enhance your command-line proficiency.
What is the difference between tar, gzip, bzip2, and zip?
Tar is an archiving utility; it bundles files but does not compress them. Gzip, bzip2, and xz are compression utilities that reduce file size. Zip is both an archiver and a compressor in one. Tar is often used in conjunction with gzip (.tar.gz) or bzip2 (.tar.bz2) to first archive and then compress. Zip creates a single archive that is also compressed.
How do I view the progress of a large tar operation?
The standard tar command doesn’t provide a progress bar natively. However, you can use tools like pv (Pipe Viewer) in conjunction with tar. For example, to create an archive: tar -cf - mydirectory/ | pv -s $(du -sb mydirectory/ | awk '{print $1}') > myarchive.tar. For extraction, you can pipe the archive through pv before tar. This provides visual feedback.
Can tar archives span multiple volumes or disks?
The traditional GNU Tar command can indeed create multi-volume archives using the -M (multi-volume) option. This allows you to split a large archive across several smaller files or physical media. When extracting, you would then need to feed these volumes to tar in the correct order. This is useful for very large backups or transfers to limited-capacity storage.
Conclusion: Mastering the Tar Command for Linux Archiving
The Tar Command in Linux (Create and Extract Archives) is a cornerstone utility for anyone working with Linux. Its ability to efficiently bundle, compress, and extract files makes it indispensable for backups, software distribution, and general file management. By understanding its core options and advanced techniques, you gain significant control over your data. This knowledge empowers you to manage your Linux environment more effectively.
Recap of Essential Tar Command Skills and Best Practices
We’ve covered creating archives with and without compression, extracting contents to specific locations, and listing archive contents. Remember to use -c for creation, -x for extraction, and -f to specify the archive file. Always consider compression options like -z for gzip. Furthermore, practice using --exclude for selective archiving. These skills form the foundation of efficient Linux file management.
Further Resources for Advanced Tar Command Usage
To deepen your understanding of the Tar command, explore its comprehensive man page by typing man tar in your terminal. Additionally, many online tutorials and forums offer advanced tips and tricks. Experiment with different options and scenarios to build your proficiency. Continuously learning and practicing will make you a more capable Linux user. Start applying these commands today to streamline your workflow!