Learning how to mount an NFS share in Linux is a fundamental skill for system administrators and power users. This process allows you to access remote filesystems as if they were local directories. By establishing an NFS (Network File System) mount, you can centralize data storage and simplify file sharing across multiple Linux machines. This guide will walk you through the essential steps, ensuring a smooth and successful setup for your remote shares.
Introduction: What is NFS and Why Mount an NFS Share?
NFS, or Network File System, is a distributed file system protocol. It enables a user on a client computer to access files over a computer network much like local storage is accessed. Developed by Sun Microsystems, NFS has become a standard for sharing files across Unix-like operating systems, including various Linux distributions. It provides a robust and efficient way to manage shared resources.
Mounting an NFS share offers significant advantages for managing data. For instance, it allows multiple clients to access the same data without duplication. This centralization improves data consistency and simplifies backups. Furthermore, it enhances collaboration among users by providing a common access point for project files.
Understanding Network File System (NFS)
NFS operates on a client-server model. The NFS server exports directories, making them available to clients. Conversely, NFS clients mount these exported directories, integrating them into their local filesystem hierarchy. This seamless integration makes remote files appear as part of the local disk structure. Therefore, users can interact with these files using standard Linux commands.
Benefits of Mounting Remote NFS Shares
The benefits of mounting remote NFS shares are numerous. Firstly, it facilitates resource sharing, allowing multiple users or systems to access common data. Secondly, it centralizes data storage, which streamlines administration and reduces storage costs. Additionally, NFS provides a flexible and scalable solution for network storage needs, adapting well to growing environments.
Overview of the NFS Mounting Process
The process of mounting an NFS share involves several key steps. Initially, you must ensure the NFS server is properly configured and exporting the desired directories. Next, the client system needs specific NFS utilities installed. Finally, you will use the mount command to connect to the remote share, either temporarily or permanently via the /etc/fstab file. Understanding these stages is crucial for a successful setup.
Prerequisites: Before You Mount an NFS Share in Linux
Before attempting to mount an NFS share, certain prerequisites must be met. These steps ensure that both the client and server are ready for the connection. Properly preparing your environment will prevent common errors and streamline the mounting process. Therefore, always verify these points first.
Identifying NFS Server Details (IP/Hostname, Export Path)
You must know the NFS server’s IP address or hostname. Additionally, you need the exact path to the directory being exported by the server. This information is critical for the mount command. For example, a server might export /mnt/nfs_share from IP 192.168.1.100. You can often discover available exports using the showmount -e [server_ip] command.
Ensuring Network Connectivity to the NFS Server
Network connectivity between the client and the NFS server is absolutely essential. You can test this connectivity using the ping command. Furthermore, ensure that no firewalls are blocking NFS traffic (typically ports 2049 for NFS and 111 for rpcbind). If firewalls are active, you will need to open these ports on both the client and server. This step prevents connection timeouts.
Understanding Server-Side NFS Exports
The NFS server must explicitly export the directories you wish to mount. This is configured in the /etc/exports file on the server. Each entry specifies the directory, allowed clients, and permissions. For example, /data/shared 192.168.1.0/24(rw,sync,no_subtree_check) allows read-write access to clients in the 192.168.1.0/24 subnet. Without proper server-side configuration, the client will not be able to connect.
Setting Up the NFS Client: Installing Necessary Packages
To successfully mount an NFS share, your Linux client system requires specific software packages. These utilities provide the necessary tools and services to interact with NFS servers. The installation process varies slightly depending on your Linux distribution. However, the core functionality remains consistent across systems.
Installing `nfs-common` (Debian/Ubuntu Systems)
On Debian-based systems like Ubuntu, you install the nfs-common package. This package contains user-space utilities for NFS clients, including the mount.nfs program. Open your terminal and execute the following commands to update your package list and install the software:
sudo apt updatesudo apt install nfs-common
This ensures all required dependencies are met. Therefore, your system will be ready to initiate NFS connections.
Installing `nfs-utils` (CentOS/RHEL/Fedora Systems)
For Red Hat-based distributions such as CentOS, RHEL, or Fedora, the equivalent package is nfs-utils. This package provides a collection of utilities for both NFS client and server functionalities. Use the yum or dnf package manager to install it. The command is straightforward:
sudo yum install nfs-utils (for CentOS/RHEL 7 and older)
sudo dnf install nfs-utils (for Fedora, CentOS/RHEL 8 and newer)
After installation, the necessary client components will be available. You can then proceed with mounting the share.
Verifying NFS Client Service Status
After installing the packages, it’s a good practice to verify that the associated services are running. On most modern Linux systems using systemd, you can check the status of NFS-related services. For example, you might check rpcbind or nfs-client.target. Use the following command:
systemctl status nfs-client.target
Ensure the service is active and running. If not, you might need to start it with sudo systemctl start nfs-client.target.
Mounting an NFS Share Temporarily in Linux
Mounting an NFS share temporarily is useful for quick access or testing purposes. This method does not persist across reboots. It provides immediate access to the remote filesystem without making permanent configuration changes. This section will guide you through the commands needed for this temporary connection.
Creating a Local Mount Point Directory
Before you can mount a remote NFS share, you need a local directory to serve as the mount point. This directory acts as the gateway to the remote files. You can create this directory anywhere on your filesystem, but common locations include /mnt or /media. Use the mkdir command with appropriate permissions:
sudo mkdir -p /mnt/nfs_remote
The -p flag ensures that parent directories are created if they don’t exist. You can choose any descriptive name for your mount point.
Using the `mount` Command for NFS Shares
The mount command is used to attach the remote NFS share to your local mount point. The Basic syntax includes the server’s IP or hostname, the exported path, and your local mount point. Here’s how to mount an NFS share in Linux temporarily:
sudo mount -t nfs 192.168.1.100:/mnt/nfs_share /mnt/nfs_remote
Replace 192.168.1.100 with your NFS server’s IP, /mnt/nfs_share with the server’s export path, and /mnt/nfs_remote with your local mount point. You can add options like -o rw for read-write access. For more details on mount options, refer to the NFS Wikipedia page.
Verifying the Temporary NFS Mount
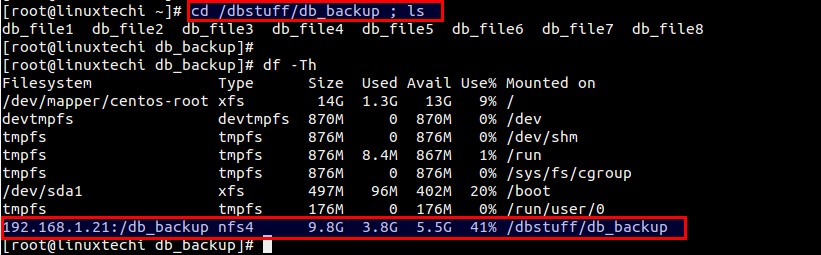
After executing the mount command, it’s crucial to verify that the NFS share is successfully mounted. You can use the df -h command to list all mounted filesystems and their usage. Look for your NFS server’s IP and the mounted path. Alternatively, simply navigate into your mount point directory and list its contents:
df -hls /mnt/nfs_remote
If you see the remote files, your temporary mount is successful. If not, check for error messages and review your previous steps.
Mounting an NFS Share Permanently Using fstab
For shares that need to be available consistently, even after a system reboot, you must configure a permanent mount. This is achieved by adding an entry to the /etc/fstab file. The fstab file automatically mounts specified filesystems during the system boot process. This method is ideal for production environments.
Understanding the `/etc/fstab` File Structure
The /etc/fstab file contains descriptive information about the various filesystems the system can mount. Each line in fstab describes a single filesystem and follows a specific format of six fields. These fields specify the device, mount point, filesystem type, mount options, dump frequency, and pass number for fsck. Incorrect entries can prevent your system from booting.

Adding an NFS Entry to `fstab`
To permanently mount an NFS share, you need to add a new line to your /etc/fstab file. Use a text editor like nano or vi to edit the file. The entry will look similar to this:
192.168.1.100:/mnt/nfs_share /mnt/nfs_remote nfs defaults 0 0
Here, 192.168.1.100:/mnt/nfs_share is the NFS server and export, /mnt/nfs_remote is your local mount point, nfs is the filesystem type, and defaults includes common options like rw, sync, hard, intr. The last two zeros disable dumping and fsck checks respectively. Always back up your fstab file before making changes.
Testing the `fstab` Entry and Remounting
After adding the entry to /etc/fstab, do not reboot immediately. First, test the entry by attempting to mount all filesystems listed in fstab. Use the command sudo mount -a. If there are no errors, your configuration is likely correct. You can then verify the mount with df -h. If errors occur, review your fstab entry for typos or incorrect syntax before rebooting. This proactive testing prevents boot issues.
Verifying and Troubleshooting Your NFS Mount
Even with careful configuration, issues can arise when trying to mount an NFS share. Knowing how to verify your mounts and troubleshoot common problems is essential. This section provides commands and tips to diagnose and resolve potential connectivity or permission errors.
Checking Mounted NFS Shares with `df -h` and `mount`
To check which NFS shares are currently mounted, use the df -h command. This command displays disk space usage for all mounted filesystems. You should see an entry for your NFS share, showing its source and mount point. Additionally, the mount command without arguments will list all mounted filesystems, including their specific mount options. These tools provide a quick overview of your current mounts.
Common NFS Mounting Errors and Solutions
Several common errors can occur when you mount an NFS share. One frequent issue is “Connection refused,” indicating a firewall problem or that the NFS server isn’t running. Another is “Permission denied,” which points to incorrect server-side export configurations or client IP restrictions. Always check server logs for more specific error messages. Solutions often involve adjusting firewall rules or modifying the /etc/exports file on the server.
Debugging Network and Permissions Issues
When troubleshooting, start by verifying network connectivity using ping. If that works, check if the server is exporting the share correctly with showmount -e [server_ip]. For permission issues, ensure the UID/GID of the user accessing the share on the client matches the permissions on the server. Also, confirm that the export options on the server (e.g., rw, no_root_squash) are appropriate for your needs. These steps systematically narrow down the problem.
Advanced NFS Mounting Options and Best Practices
Beyond basic mounting, NFS offers various options to fine-tune performance, security, and behavior. Understanding these advanced settings allows for more robust and efficient NFS deployments. Implementing best practices ensures stability and optimal operation of your mounted shares.
Understanding `rw`, `sync`, `async`, and `noatime` Options
Mount options like rw (read-write) and ro (read-only) control access permissions. The sync option ensures that changes are written to disk before the client receives confirmation, providing data integrity but potentially slower performance. Conversely, async writes data asynchronously, offering better performance but a slight risk of data loss on server crash. noatime disables updating file access times, which can significantly improve performance for frequently accessed files.
- `rw` / `ro`: Read-write or read-only access.
- `sync` / `async`: Data write synchronization behavior.
- `noatime`: Prevents updating access times for files.
Implementing Security with `sec=` Options for NFS Mounts
NFS security can be enhanced using the sec= mount option. For instance, sec=sys uses standard UNIX authentication (UID/GID mapping). For stronger security, sec=krb5, sec=krb5i, or sec=krb5p leverage Kerberos for authentication, integrity checking, and privacy, respectively. Choosing the right security option depends on your environment’s requirements. Always prioritize security, especially for sensitive data.
Automating Mounts with `autofs` (Brief Overview)
For dynamic environments, autofs provides on-demand mounting of NFS shares. Instead of mounting all shares at boot, autofs mounts them only when accessed. It then unmounts them after a period of inactivity. This saves system resources and can improve boot times. While more complex to set up, autofs is a powerful tool for managing many NFS mounts efficiently.
Frequently Asked Questions
How do I unmount an NFS share in Linux?
To unmount an NFS share, use the umount command followed by the local mount point. For example, sudo umount /mnt/nfs_remote. Ensure no processes are actively using files within the mount point before unmounting. If a share is busy, you might need to use lsof /mnt/nfs_remote to identify and kill processes, or use umount -l for a lazy unmount.
What if my NFS mount fails on boot?
If an NFS mount fails on boot, your system might enter emergency mode. This usually indicates an issue with the /etc/fstab entry. Boot into rescue mode, comment out the problematic NFS line in /etc/fstab, and reboot. Then, troubleshoot the entry by manually attempting to mount it and checking server connectivity and export configurations. Ensure the _netdev option is used in fstab for network filesystems to prevent mounting before the network is up.
Can I mount multiple NFS shares from one server?
Yes, you can absolutely mount multiple NFS shares from a single server. Each share will typically have its own export path on the server and require a unique local mount point on the client. You would add a separate line to your /etc/fstab file for each distinct NFS share. This allows for granular control over different data sets.
What are the security considerations for NFS?
NFS traditionally has had security vulnerabilities. Key considerations include restricting access to trusted IP addresses or subnets in the server’s /etc/exports file. Using firewall rules to limit access to NFS ports is also crucial. For sensitive data, consider using more secure authentication methods like Kerberos (sec=krb5 options) or even encrypting the underlying network traffic with VPNs. Avoid using no_root_squash unless absolutely necessary.
How do I check available NFS exports from a server?
You can check which directories an NFS server is exporting by using the showmount -e [server_ip_or_hostname] command from your client machine. This command queries the server and lists all currently exported directories along with the clients allowed to access them. This is a very useful diagnostic tool when setting up or troubleshooting NFS mounts.
Conclusion: Successfully Mounting NFS Shares in Linux
Mastering how to mount an NFS share in Linux is a valuable skill for anyone managing networked systems. We’ve covered everything from understanding NFS basics to temporary and permanent mounting methods. Remember to always verify prerequisites, carefully configure your /etc/fstab entries, and troubleshoot systematically. Proper planning and execution ensure reliable access to your shared network resources.
The ability to integrate remote filesystems seamlessly into your Linux environment significantly enhances productivity and data management. Persistent mounting, especially in production environments, guarantees continuous data availability. Therefore, take the time to implement these steps correctly. Continue exploring advanced options and security best practices to optimize your NFS deployments. Share your experiences or questions in the comments below!