The Gzip command in Linux is an indispensable utility for efficient file compression. It significantly reduces file sizes, saving valuable disk space and accelerating data transfer over networks. Understanding and mastering this powerful command is crucial for any Linux user, from beginners to seasoned system administrators. This guide will explore the Gzip command’s core functionalities, advanced options, and best practices to help you optimize your Linux workflow.
Introduction to the Gzip Command in Linux
Gzip, short for “GNU zip,” is a popular data compression program developed for the GNU operating system. It primarily uses the Lempel-Ziv coding (LZ77) algorithm to compress files. This utility is a fundamental component of most UNIX-like systems, including Linux distributions. Its widespread adoption stems from its efficiency and ease of use.
The Gzip command in Linux is not just for saving space. It also plays a vital role in speeding up file transfers and reducing bandwidth consumption. Many web servers, for instance, use Gzip to compress web content before sending it to browsers. Therefore, knowing how to leverage Gzip effectively is a valuable skill.
Basic-syntax">Understanding Gzip: Core Concepts and Basic Syntax
Gzip operates by finding redundant data patterns within a file and replacing them with shorter references. This process results in a smaller file size. However, it’s important to note that Gzip is designed for single-file compression. It does not archive multiple files into one, unlike tools like Zip or Tar.
What is Gzip and How Does it Work?
At its heart, Gzip employs the DEFLATE algorithm, which is a combination of LZ77 and Huffman coding. This method identifies repeating sequences of bytes and stores them more compactly. Consequently, the original data can be perfectly reconstructed from the compressed version. This makes Gzip a lossless compression utility.
When you compress a file using Gzip, it typically appends a `.gz` extension to the filename. For example, `document.txt` becomes `document.txt.gz`. The original file is usually replaced by its compressed counterpart. This behavior is important to remember, especially when dealing with critical files.
Basic Gzip Command Syntax for File Compression
Using the Gzip command in Linux for basic compression is straightforward. You simply provide the filename as an argument. The command processes the file and creates a compressed version.
gzip filename.txtThis command will compress `filename.txt` into `filename.txt.gz` and delete the original `filename.txt`. Furthermore, you can compress multiple files simultaneously by listing them after the `gzip` command. This saves time when managing several files.
Preserving Original Files (using -k option)
Sometimes, you might want to keep the original file after compression. The `-k` or `–keep` option allows you to do this. This is particularly useful for creating backups or when you need both the compressed and uncompressed versions.
gzip -k important_log.logAfter executing this command, both `important_log.log` and `important_log.log.gz` will exist in your directory. This option prevents accidental data loss and provides flexibility. Therefore, always consider using `-k` for sensitive data.
Advanced Gzip Command Options and Usage
The Gzip command in Linux offers several options to fine-tune its behavior. These advanced features allow for greater control over compression levels and how files are handled. Learning these options can significantly enhance your command-line efficiency.
Controlling Compression Level (gzip -1 to -9)
Gzip allows you to specify the compression level, ranging from `-1` (fastest compression) to `-9` (best compression). A lower number means faster execution but a larger compressed file. Conversely, a higher number provides a smaller file but takes more time to process.
-1or--fast: Offers the quickest compression, ideal for real-time data streams.-9or--best: Achieves the highest compression ratio, suitable for long-term storage.-6(default): Provides a good balance between speed and compression.
For example, to achieve the maximum compression for a large database dump, you would use: gzip -9 database_dump.sql. Choosing the right level depends on your specific needs regarding speed versus file size.
Recursive Compression of Directories (using find and xargs)
As Gzip compresses individual files, it cannot directly compress an entire directory. However, you can combine it with other Linux commands like `find` and `xargs` to achieve recursive directory compression. This powerful combination allows you to process many files within a directory structure.
find /path/to/directory -type f -print0 | xargs -0 gzipThis command finds all regular files (`-type f`) within the specified directory and pipes their names to `gzip`. The `-print0` and `-0` options handle filenames with spaces correctly. Alternatively, you can use `tar` to create a compressed archive of a directory, which is often simpler for this task.
Appending to Gzipped Files (using -c and redirection)
Directly appending content to an already gzipped file is not straightforward. Gzip is designed to compress a file as a whole. However, you can simulate appending by compressing new data to standard output (`-c`) and redirecting it to an existing gzipped file. This method effectively concatenates the compressed streams.
gzip -c new_data.txt >> existing_archive.gzIt’s important to note that while this adds data, the resulting file might not be optimally compressed. For true appending and re-optimization, you would typically decompress the existing file, add the new data, and then re-compress the entire file. This ensures the best possible compression ratio.
Working with Gzipped Files: Decompression and Inspection
Once files are compressed using the Gzip command in Linux, you’ll inevitably need to decompress them or inspect their contents. Linux provides dedicated tools and options for these tasks. These utilities streamline the process of managing your compressed data.
Decompressing Gzipped Files with Gunzip
The `gunzip` command is the counterpart to `gzip`. It is specifically designed to decompress files that were compressed with Gzip. When you use `gunzip`, it restores the file to its original uncompressed state and removes the `.gz` extension.
gunzip filename.txt.gzThis command will decompress `filename.txt.gz` back to `filename.txt`. You can also use `gzip -d filename.txt.gz` to achieve the same result, as `-d` is the decompression option for `gzip`. Both methods are equally effective for restoring your files.
Viewing Gzipped File Contents Without Decompression (zcat, zless)
Often, you only need to view the contents of a gzipped file without fully decompressing it. This saves disk space and time. Linux offers specialized tools like `zcat` and `zless` for this purpose.
zcat: Displays the uncompressed content of a `.gz` file to standard output. It’s useful for quickly piping content to other commands. Example:zcat logfile.gz | grep "error".zless: Allows you to view the content of a `.gz` file page by page, similar to the `less` command. This is ideal for inspecting large log files. Example:zless large_data.csv.gz.
These commands are incredibly useful for quick inspections and debugging. They avoid the overhead of full decompression, making your workflow more efficient. Furthermore, they are part of the `gzip` package, so they are readily available.
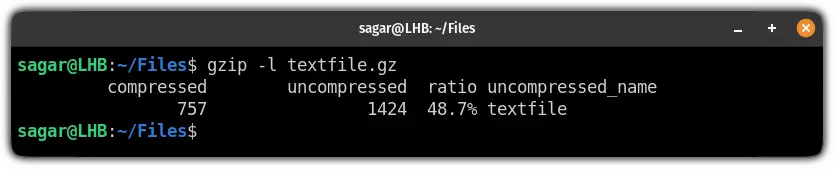
Listing Gzipped File Information (gzip -l)
To get details about a gzipped file without decompressing it, you can use the `gzip -l` option. This command provides useful statistics about the compressed file. It helps you understand the effectiveness of the compression.
gzip -l filename.txt.gzThe output typically includes the compressed size, uncompressed size, and the compression ratio. This information is valuable for monitoring disk usage and assessing compression performance. For instance, a high compression ratio indicates significant space savings.

Gzip vs. Other Linux Compression Tools & Best Practices
While the Gzip command in Linux is excellent, it’s not the only compression tool available. Understanding its strengths and weaknesses compared to alternatives like Bzip2 and XZ is important. Choosing the right tool for the job ensures optimal performance and resource utilization.
Gzip vs. Bzip2 and XZ: A Comparison
Each compression utility uses different algorithms, leading to varying compression ratios and speeds.
- Gzip: Uses DEFLATE. It is generally the fastest but offers the least compression. Ideal for speed-critical applications like web server content compression.
- Bzip2: Uses Burrows-Wheeler transform. Provides better compression than Gzip but is significantly slower. Files typically have a `.bz2` extension.
- XZ: Uses LZMA2 algorithm. Offers the best compression ratio, often significantly outperforming Gzip and Bzip2. However, it is the slowest to compress and decompress. Files have a `.xz` extension.
Therefore, the choice depends on your priorities: speed, compression ratio, or a balance of both. For general-purpose compression, Gzip is often a good default due to its speed.
When to Choose Gzip for Specific Tasks
Gzip excels in scenarios where speed is paramount. It is widely used for compressing web content on the fly, reducing page load times. Additionally, it’s a common choice for compressing log files that are frequently accessed or rotated. Its fast decompression speed makes it suitable for these dynamic environments.
Consider Gzip when:
- You need quick compression and decompression.
- Bandwidth savings are important, such as for network transfers.
- You are compressing individual files, especially text-based ones.
- You are integrating compression into automated scripts for daily tasks.
For archiving multiple files or directories into a single compressed bundle, combining Gzip with `tar` (e.g., `tar -czvf archive.tar.gz /path/to/dir`) is the standard practice. You can learn more about Gzip on its official GNU page: GNU Gzip.
Optimizing Gzip Usage and Script Integration
To optimize your use of the Gzip command in Linux, always consider the compression level. For archival purposes, `-9` is best, while for temporary files, `-1` might suffice. Integrate Gzip into your shell scripts for automated tasks like daily log rotation or backups. This ensures consistent and efficient file management.
For example, a cron job could automatically compress old log files: `0 2 find /var/log/apache2 -name “.log” -mtime +7 -exec gzip {} ;`. This command finds log files older than 7 days and compresses them. Such automation significantly reduces manual effort and maintains system hygiene.
Troubleshooting Common Gzip Command Issues
Even with a straightforward utility like the Gzip command in Linux, users might encounter issues. Knowing how to diagnose and resolve these common problems can save time and frustration. Most errors are related to file paths, permissions, or the nature of Gzip itself.
Handling ‘No such file or directory’ Errors
This error typically means that the file you are trying to compress or decompress does not exist at the specified path. It’s one of the most frequent issues users face. Always double-check your spelling and the file’s location.
To resolve this:
- Verify the filename and its extension.
- Ensure you are in the correct directory, or provide the full path to the file.
- Use `ls` or `find` to confirm the file’s presence and exact name.
For instance, if you type `gzip myfile.text` instead of `gzip myfile.txt`, you will receive this error. Precision in command-line arguments is key.
Resolving ‘Is a directory’ Errors
As discussed, Gzip is designed for individual files, not directories. Attempting to run `gzip mydirectory/` will result in an “Is a directory” error. This is a common misunderstanding for new users.
To compress a directory:
- Use `tar` to create an archive of the directory, then compress the archive: `tar -czvf mydirectory.tar.gz mydirectory/`.
- Alternatively, use `find` and `xargs` to compress all files within the directory individually, as shown previously.
Remember, `tar` is the preferred method for compressing entire directory trees into a single, manageable archive. It maintains the directory structure within the archive.
Dealing with Corrupted Gzipped Files
Occasionally, a `.gz` file might become corrupted due to incomplete transfers, disk errors, or other issues. When you try to decompress it, `gunzip` might report an error like “unexpected end of file” or “invalid compressed data.”
While full recovery is often difficult, you can try:
- Using `gunzip -t filename.gz` to test the integrity of the compressed file without decompressing it.
- If possible, obtain a fresh copy of the file.
- For partially corrupted files, sometimes `zcat` can still display some content before encountering the error, which might help salvage some data.
Prevention is better than cure; always ensure proper file transfers and disk health to minimize corruption risks.
Frequently Asked Questions
Does gzip compress directories directly?
No, the Gzip command in Linux compresses individual files only. If you attempt to use `gzip` on a directory, it will return an error stating that it “Is a directory.” To compress an entire directory, you should first use the `tar` command to archive the directory into a single `.tar` file, and then compress that `.tar` file with Gzip (e.g., `tar -czvf archive.tar.gz directory_name/`).
How do I decompress a .gz file?
You can decompress a `.gz` file using the `gunzip` command, which is typically installed alongside Gzip. Simply type `gunzip filename.gz` in your terminal. Alternatively, you can use the `gzip -d filename.gz` command, as `-d` is the decompression option for Gzip. Both commands will restore the original file and remove the `.gz` extension.
What is the difference between gzip and zip?
The primary difference lies in their functionality. Gzip (GNU zip) is designed to compress single files and typically replaces the original file with a `.gz` compressed version. It does not create archives of multiple files or directories. Zip, on the other hand, is an archiving utility that can combine multiple files and directories into a single `.zip` archive, and it can also compress them. Zip files can also be password-protected, a feature Gzip lacks. For multiple files, `tar` combined with `gzip` (creating a `.tar.gz` or `.tgz` file) is the Linux equivalent of a `.zip` archive.
Conclusion: Mastering the Gzip Command for Linux Efficiency
The Gzip command in Linux is a fundamental tool for managing files and optimizing system resources. From basic file compression to advanced usage with `find` and `tar`, its versatility makes it indispensable. By understanding its options and integrating it into your daily workflow, you can significantly improve disk space utilization and data transfer speeds.
Embrace the power of Gzip to streamline your operations, whether you’re a developer, system administrator, or a casual Linux user. Practice these commands, explore further options, and share your tips with the community. Mastering this utility is a definitive step towards greater Linux proficiency. What are your favorite Gzip tricks? Share them in the comments below!
One thought on “Gzip Command In Linux: Master File Compression Now”